Google
 

Monday, December 24, 2007

Season's greetings!


Best wishes to everyone! Have a safe and happy holiday.

Wednesday, December 19, 2007

ExcelCalcs

ExcelCalcs hosts user generated Microsoft Excel formula for everything from quadratic equations to snow loads and rectangular spread foundation analysis. The site seems to be relatively new and if it keeps going it may turn into a real go-to place for calculations that one might need to build a home; until then it's still worth a look.

Troll Haven


Troll Haven
is located in Gardiner, Washington.

While not labeled a "Castle", this building certainly fits in among the other creations that share the label on this site. The owner-built creation was put together just for fun from what I can gather. Troll Haven is a private residence but tours can be arranged, and there are vacation homes and the expansive grounds can be rented for reunions, weddings and various other functions.

Not sure how to classify this one!


Solomon's Castle in Florida.

This castle is in it's own shining armor. Built by Howard Solomon since 1972, this castle has grown into a 12,000 sq. ft. tourist attraction used as a gallery, restaurant and shop for Solomon's art. The exterior is covered with discarded aluminum printing plates, giving a brilliant finish. Very little construction information available and no good pictures of the interior to be found. You can rent a 500 sq. foot efficiency apartment as a bed-and-breakfast room at the castle.

Hammer-beam roof


I had created one of these structures using Sketchup and mistakenly called it a truss or support. I learned recently that these structures in an open timber roof are called "hammer beam" type roofs. For any would be castle-builder a "great-hall" is probably on the wish list to be built as part of the structure, and having a hammer beam type roof over the room is probably part of the design. Thanks to modern construction techniques one could probably build a roof in such a manner that the components of a hammer beam type roof would not be structural. Try designing a hammer beam type roof and telling the building code department that it's going to hold your roof up. I think you might run into some trouble there unless you're a structural engineer, and even then I'm sure there'd be resistance.

Just my opinion, but I think the better route using modern materials to accomplish a hammer beam type roof in your modern castle would be to use a steel ridge beam supported on either end of the room by steel supports. This allows for a very strong structure holding the roof peak up with no worry about sagging. The hammer beam roof trusses could be constructed of lighter wood and/or hollow glued-up components (like a hollow square table leg) and affixed to the roof and walls. It would still likely require stronger roof rafters as the hammer beams would likely be partially suspended from them and thus incur additional expense in the roofing materials, but it would seem to be cheaper than having heavy, solid beams engineered to support the real thing.

The picture is from Buffalo Architecture, more info on hammer beam roofs there, as well as Wikipedia.

(EDIT:Updated links due to changed web address)

Castle for Sale


I found this castle for sale in Hiram, Georgia. It looks to be of the "modified residence" type, but I can't tell for sure. The pictures lead me to believe that it was a regular house that has been remodeled and added to. If I had to guess, I'd say the exterior is concrete block and stucco. At any rate, you can have this 3,200 sq. ft. castle plus maid's quarters for $1.3M USD.

Sunday, December 16, 2007

Shameless plug for my better half's store...

Want to get your loved one a nice piece of jewelry? Visit my wife's stores on eBay and Ruby Lane. A large selection of vintage and antique fine sterling and costume jewelry, specializing in sterling Norwegian Enamel pieces. We occasionally have items from English makers as well. Items that we have fairly regularly: David Andersen, Bernard Instone, Bernhard Meldah, Norman Grant, Murrle Bennett, Theodor Fahrner, Volmer Bahner, Ivar Holt, Wachenheimer, Arne Nordlie, Finn Jensen, Aksel Holmsen, Hroar Prydz, Charles Horner; and costume pieces by Miriam Haskell, Castlecliff, Danecraft, Juliana, Goldette, Lisner, Schiaparelli, Coro, Hobe, Mazer, Sarah Coventry, and many others on occasion. Anything from brooches, necklaces, rings, tie bars and cuff links.

Yep, it's "keyword spamming" and a shameless plug, but we gotta pay for the Christmas presents somehow!

EDIT: We are no longer selling on Ebay as of April '08 due to Ebay's changes in policy towards sellers. The changes raise fees, eliminate the seller's ability to leave feedback for buyers (all of our sales ID's have 100% positive feedback), and reward buyers that have bad behavior by giving them discounts when they complain. This raises the costs to small sellers, who essentially built Ebay when it was young, prevents the checks and balances system from working by allowing dishonest buyers to get away with their practices, and rewards buyers that place unjustified complaints to get a discount at the expense of the seller. This also means that there will be less variety on Ebay, making it harder for people to find oddball and unique items. Ebay, it appears, is no longer interested in small sellers and is driving towards large volume sellers who can handle the fees and feedback hits.

Please do visit the Ruby Lane store, we've moved everything to the new location!

Friday, December 14, 2007

Roofing material

After a recent comment by a visitor I decided to look at roofing materials a little closer. There are a lot of materials available to the builder out there, anything from the standard wood shingles to terracotta tile. What one chooses will be a matter of budget, environment and aesthetic choice.

Starting with the basics, the standard shake or shingle roof.

These can last 30-50 years, but usually are only "guaranteed" to last 25. These are usually made from cedar trees, can be expensive to install, and can require periodic maintenance to re-seal the wood. Also, local fire code can prohibit their use in some areas, and some insurance companies may not like them other due to the fact that it is wood, and will burn or ignite relatively easily. They look great, though, and aesthetically can make or break a building depending on the style you are going for. The shingles age to a nice silver or dark brown depending on how they are treated, and can really add a sense of age to a building. These cost anywhere from $70-170.00 per every hundred square feet of roofing and depends on the type (shake or shingle), size and roof pitch.

There are substitutes for this type of roof that look very similar that are made from asphalt or cement-type material. They look pretty close to the real thing, last longer, require less maintenance, and in case of the cement based shingle, can be almost fireproof.

While on the subject of cement based shingles: Something to consider- the cement based shingle weighs a lot more and will require extra support, that means more or heavier trusses, and that means it will cost more due to the extra structure. Double the cost of wood shingles for the first-time installation. That's pretty substantial, but the investment will be returned over the lifetime of the building. These shingles will outlast you, and remain in service for around 100 years. Quite a selling point to a potential buyer, fire resistance and a roof that will probably last 2-3 owners. This product also comes in a wide variety of styles, anything from shingle lookalikes to simulated slate.

Next choice, metal roofing. This roofing type features some of the same benefits and drawbacks of cement roofing. It also comes in a wide variety of styles; shingles, slate, flat, strips, copper, anodized, painted; the choices are only limited by budget. The cost: $100-600 dollars per 100 square feet, the top end being the cost of a beautiful copper roof. The benefit: almost completely fireproof, looks great, very low maintenance, and can last up to 150 years.

Slate roofs are one of the most expensive. $1000 per 100 square feet. The reasons? Extra support required to hold the weight of the stone roof and the need for a skilled craftsman to install the material. This would be a great material to have if you didn't have too many budget constraints, it's as old-world real as you can get. The slate itself will last forever, it is stone, but the roof may require maintenance to repair cracked shingles or the hardware used to affix the slate to the roof. Slate roofs look fantastic, though; especially with age. They add a sense of weight and solidity to a building, as well as old-world charm.

Along the lines of old-world charm, there is simulated thatch available, but this stuff is even more expensive than slate. $1300 per 100 square feet, not including any hardware or special parts like eaves or corners. The material is PVC, and fire resistant. It looks just like the real thing, is low maintenance, and lasts around 50 years. If you absolutely have to have that thatched roof on your castle or cottage, this would be the way to go.

Another roof type is a rubber roof. If your are installing a "flat" roof, one with a very low pitch, this can be a viable choice. Rubber roofs (E.P.D.M.) cost a little less than $100 per 100 square foot and can last 50 years.

Terracotta roofing will be around $500-800 per square 100 ft. to install. Like slate or cement, weight is a consideration when installing this roof type. Another consideration is that some types are porous, and can absorb water. Not a problem in a perpetually warm area, but if you live anywhere that there are below freezing temperatures regularly your roof can disintegrate, so this type will likely be restricted to warmer climes. This material can be very colorful, and looks great. It also will not burn, so fire resistance is a benefit.

Again, these costs are only general and don't include the costs of any structural modifications needed to support the roof, nor does it include the cost of any extra work or materials needed to work around chimneys or vents, or hardware such as flashing and gutters. Roof pitch can also contribute to cost. Also, local code obviously is a factor. One additional benefit is that some roof types may get you an insurance discount due to longevity and fire resistance.

For the structure I'd like to build, I would probably choose a simulated slate or a metal roof. One for the looks or the other for durability, either of them are good for fire resistance and low maintenance . If budget were no constraint, copper or thatch would be a consideration.

Wednesday, December 12, 2007

Castle Thornwood

Castle Thornwood is a castle in planning located near Anchorage, Alaska.

I came across this site while digging for castles using a search engine other than Google. I'm not entirely sure, but as far as I can tell, the land has been selected and purchased, but no construction has begun. There are some pictures and plans on the Castle Thornwood website. I'll take a guess that the castle owner/builder is near Wasilla, due to a recent spate of visits to this site from that area. Good luck with your castle!

Tuesday, December 11, 2007

More on how to build an arch

Ok, after adding to and reviewing my "how to", I realized it's a pretty poor description. It's difficult to describe all the parts and what something looks like, so I went ahead and threw something together in Sketchup to provide a better depiction of how I would build a Gothic arch, specifically in this case how I would build a window frame.

You'll need to build your window or object that you wish to make copies of at least once by hand. You could build it out of wood, strong foam, plaster, clay or whatever suits your abilities best. It has to be exactly what you want it to look like, fit and finish, because every flaw will come out in the end. You are making copies of every mistake.

You'll need both halves of the frame complete. Your object to be copied must have some kind of mold-release sprayed on it in order to remove it from your mold without the silicone adhering to it and causing damage to your mold due to tearing. Place some small blocks of already cured silicone in the bottom of one half of the frame, these should be of a height to center your object in the mold half so that it is bisected along the edge of the mold. Pour silicone into your perfectly level mold around your object to fill the mold up to the edge. (I suppose that I should have mentioned that the ends you left open to pour cement in the mold should be sealed for this) Allow the molding agent to cure. Do not remove your object. Once it has cured, add mold release material to the cured material so that the next silicone will not stick to it.

Combine the two mold halves and secure them together. Through the ends where the cement would be poured, or through a hole cut in the backing (It may be too difficult to stand your mold on end to pour the agent in from the end if your piece is too large, or if you feel your object will shift or fall out of the half it is in; so you may need to cut a hole in the backing that will allow you to fill the mold half while laid flat. This is a much safer method.) you will need to fill the remaining mold with the agent.

Allow to cure.

Remove the clamps or whatever you've secured the halves together with.

Separate the mold halves carefully. With any luck, the releasing agent will have prevented the silicone from sticking to itself or your object. If not, good luck. You should also be able to remove the object from the mold.

Cut holes in the mold somewhere that is not visible in the finished product (such as the bottoms in the window depicted) where you can pour cement, and you now have your mold. You can make as many copies of your object as you want, for as long as the silicone lasts.


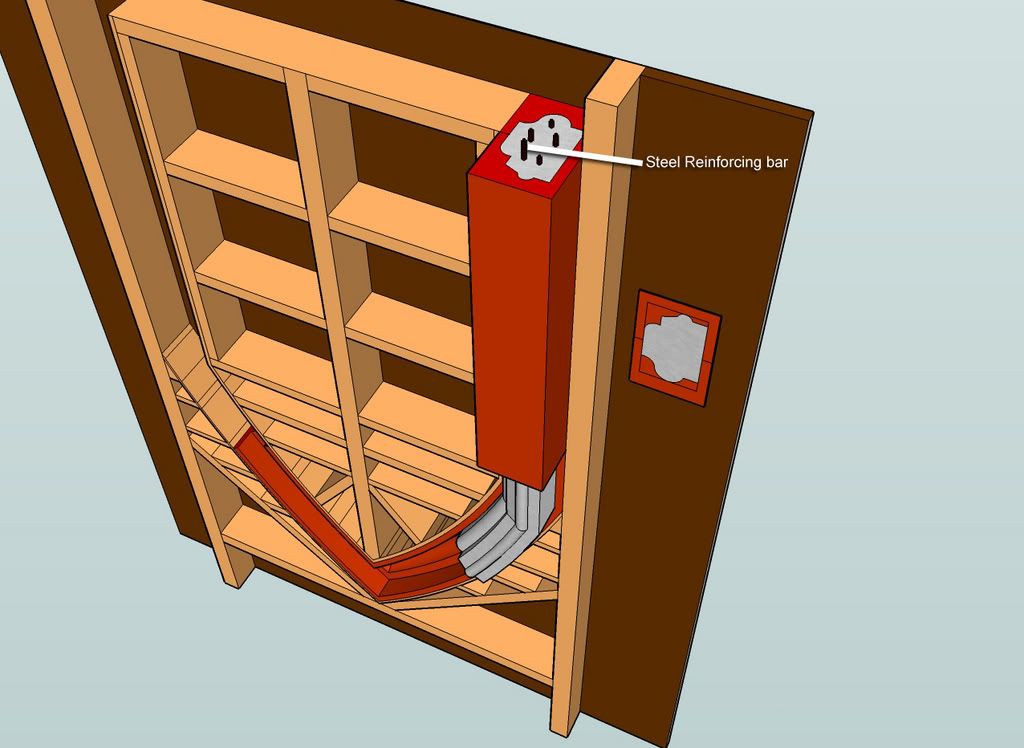
(right click image and select "view image" in Firefox to see a large version of this image)

In this picture, the window is upside down, as this is how cement would be poured into the mold. There is only HALF of the mold depicted here. You would need the other half mirroring the one depicted to complete the assembly and pour.

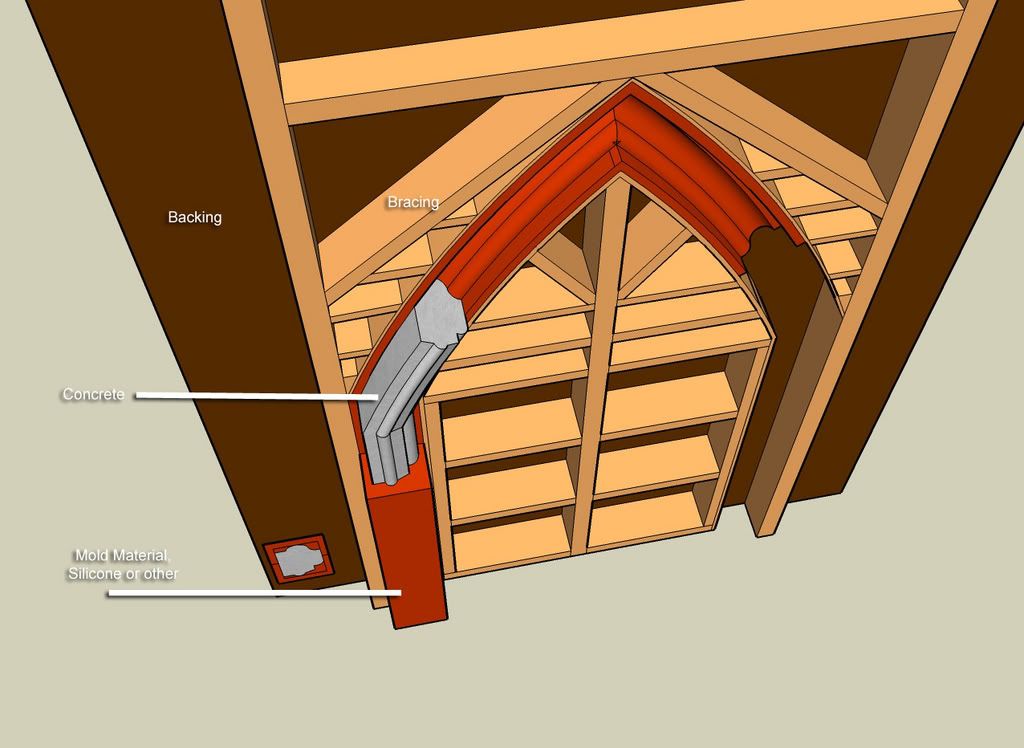
The dark brown represents the backing of the mold, likely a strong sheet of plywood.

The light brown represents the bracing of the mold. The heavy parts could be 2x4, or other stock depending on the weight and amount of cement being poured. The last thing you'd want is for the form to flex or leak, so I figure to over-brace and over build is probably better.

The red material is whatever you can use to take the form of your object. Most places seem to sell a pourable silicone or similar rubbery material that solidifies around your object that can be easily cut and flexed to allow the object to be removed.

The grey material is cement. The cement would be poured from the open ends of the mold.

The black rods are steel reinforcing bar (re-bar). I'd personally use re-bar and probably wrap it with chicken wire to provide extra strength for the cement. This will help prevent cracking during movement and installation. You'll want extra reinforcing at the peak of the window, as sharp corners are going to be the areas most likely to crack. You'll need to support the re-bar in the mold in such a manner that it does not breach the outside of the cement (it can't touch the red part). This could probably be done with string, small gauge wire, or similar. You don't want it creating a thin area where it might breach the outside of your window or arch, or cause rust stains to develop.


When the halves are assembled for pouring, I'd use screws, bolts and nuts, C-Clamps, or whatever is most suitable to prevent the halves from separating.

If you were truly a glutton for punishment, you could take your window frame or arch and cut it into segments. If you look at many arches, they are composed of segments that were blocks of stone, each carved to match the next and continue the shape of the arch. Cutting your arch into segments and faintly beveling the edges where the segments meet would simulate this same look. Don't forget to compensate for the material removed by the saw blade that will shorten the overall length of your arch. Add even a little bit more realism by creating tooling marks in your object that look like real stone working tool marks, and even use cement dye to color the individual segments slightly differently, like it came from different blocks of stone.


This picture is from Building Construction Illustrated, Third Edition, by Francis D. K. Ching and Cassandra Adams. Ch. 5, pp. 20, Wall Systems: Masonry Arches. Provided to show some of the forces in the arch as well as various arch styles.


No idea where I found this one; again, more style information. I'll credit the artist if anyone knows who that might be.


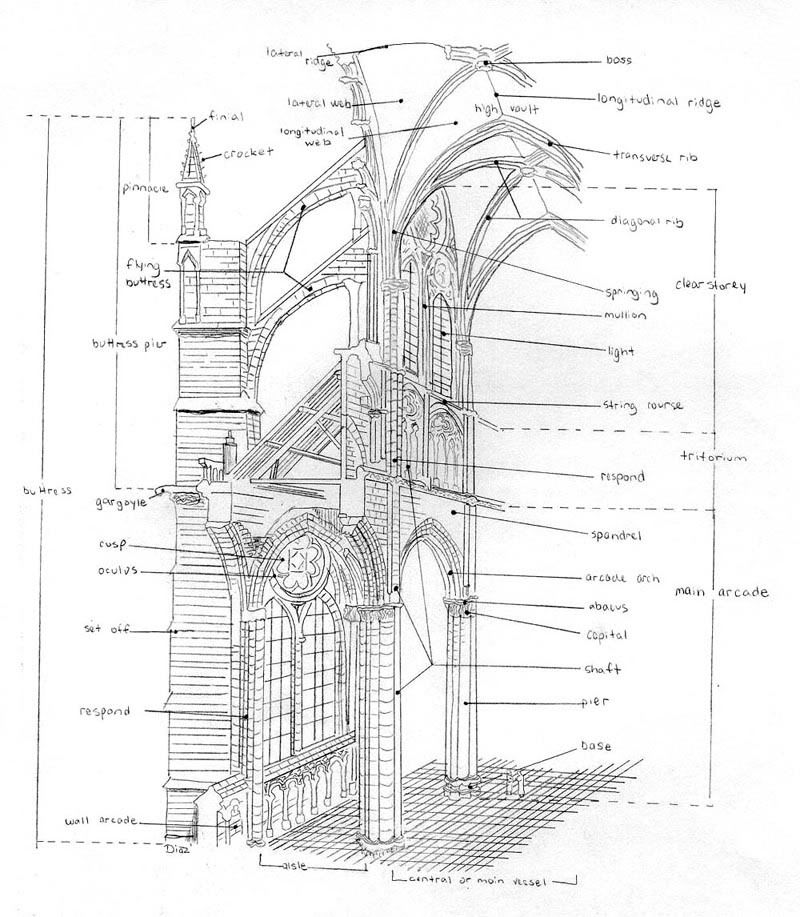
Another image naming the various parts of arches and vaults in a cathedral. Again, I saved this pic a long while ago, and if anyone knows the author I'd be happy to give credit.

* Please note, follow whatever instructions and safety requirements for the molding agent and material you are using; the ideas above are only generic and meant to provide inspiration and ideas to readers. These are only general ideas and thoughts on how to build an arch, follow them and implement them at your own risk.

EDIT: A little more research revealed that latex molding materials are considerably cheaper than silicone. It may not be as durable, but if you only need to make a few pieces, it's probably better to go that route and not have some expensive molds laying around that you'll never use again.

Sunday, December 9, 2007

Sketchup again


Another model created with Sketchup. I like how this one is taking shape. I tried to place more interesting architectural details in the exterior, and the resulting shape will certainly create a more complicated interior as well. That is what I'm after, though... This isn't some run-of-the-mill box that I'm wanting to spend my money, time, sweat and tears building. It's gotta be one of those things where, after I'm done swearing that I'll never ever build one again, I look up at what has been accomplished and think that it's pretty dang cool...

Saturday, December 8, 2007

Sprayed-foam insulation

I've mentioned in the past that ICF might be one of the methods we considered for building the shell of a structure; but costs to use that method are fairly high, as well as it not always being very easy for the inexperienced owner-builder to use. One of the benefits of the ICF method is the high R-value you get compared to most other materials. One of the ways to bring up the R-value on other construction is to use spray-in insulation, Icynene being one of the more widely known. But... Icynene costs around $4+ a square foot to have done; you can't really do it yourself too easily due to the tooling and experience necessary to do the job. At that cost, I've seen estimates for a 2,500 sq.ft. home costing well over $20,000 for walls and roof. That's a LOT of money for just insulation.

Well, maybe there's a way around that. Fomo Foam sells DIY spray-in insulation kits that could cut the cost significantly for an owner builder. Fomo Foam costs just over $1 per square foot of wall. Compare that to fiberglass batting which can cost $.50 per square foot per inch, and cellulose which costs a little over $1 per square foot as well. Looking at it that way, using the DIY spray in foam looks to be by far the best. You'll get as good as, if not better, insulative qualities than cellulose, none of the slightly hazardous problems of installing fiberglass, and have the sealing qualities of foam. Sounds like Fomo Foam might be doing some more research on.

Friday, December 7, 2007

Small Blue Printer

Now this is interesting: Small Blue Printer allows you to put together a basic floor plan on your web browser, no software download or experience necessary. It even offers a "3D" view. Now, it isn't a full-blown architect program like 3D Architect or a modeling program like Sketchup and so it's features are limited; but if you want to experiment with basic layouts for your dream home or castle, it'll do just fine.

Thursday, December 6, 2007

Update

I've updated the "How to Build an Arch" post here on the blog. It seems to be very popular (over 20% of the hits here). It now includes more information on building arches.

A few links at the bottom have been updated and added to; also, check out the "New American Castle" again, they've updated the site photos.

Wednesday, December 5, 2007

Castle Freedom

Castle Freedom appears to be a large castle in planning stages. Not too much specific information, just a general idea of what they'd like to have. The author links to a self improvement site, not sure if there is a commercial connection there.

Lacey Michele's Castle


Lacey Michele's Castle is located in west Arkansas.


This castle has a sad story behind it. To sum up a bit: The builder happened to find out that he'd had a daughter with a previous girlfriend, and the girlfriend hadn't mentioned it to him. After finding out, he struck up a good relationship with the child, and promised to build her a castle someday. Tragically, the little girl died due to complications of the flu and the medication she was on. The builder went ahead and built the castle in her memory. The full story here: USAToday.com

Constructed of stone and cement, along with whatever found/purchased items could be added such as metal roofing, found garden gates, and vinyl windows. Some of the site photos seem to indicate that it is still partially under construction. What an incredible amount of work, and the result is very impressive.

The castle has a section that you can rent for $110/night, and is located in a rural area suitable for all kinds of outdoor activities, from hunting to hiking.