You'll need to build your window or object that you wish to make copies of at least once by hand. You could build it out of wood, strong foam, plaster, clay or whatever suits your abilities best. It has to be exactly what you want it to look like, fit and finish, because every flaw will come out in the end. You are making copies of every mistake.
You'll need both halves of the frame complete. Your object to be copied must have some kind of mold-release sprayed on it in order to remove it from your mold without the silicone adhering to it and causing damage to your mold due to tearing. Place some small blocks of already cured silicone in the bottom of one half of the frame, these should be of a height to center your object in the mold half so that it is bisected along the edge of the mold. Pour silicone into your perfectly level mold around your object to fill the mold up to the edge. (I suppose that I should have mentioned that the ends you left open to pour cement in the mold should be sealed for this) Allow the molding agent to cure. Do not remove your object. Once it has cured, add mold release material to the cured material so that the next silicone will not stick to it.
Combine the two mold halves and secure them together. Through the ends where the cement would be poured, or through a hole cut in the backing (It may be too difficult to stand your mold on end to pour the agent in from the end if your piece is too large, or if you feel your object will shift or fall out of the half it is in; so you may need to cut a hole in the backing that will allow you to fill the mold half while laid flat. This is a much safer method.) you will need to fill the remaining mold with the agent.
Allow to cure.
Remove the clamps or whatever you've secured the halves together with.
Separate the mold halves carefully. With any luck, the releasing agent will have prevented the silicone from sticking to itself or your object. If not, good luck. You should also be able to remove the object from the mold.
Cut holes in the mold somewhere that is not visible in the finished product (such as the bottoms in the window depicted) where you can pour cement, and you now have your mold. You can make as many copies of your object as you want, for as long as the silicone lasts.

(right click image and select "view image" in Firefox to see a large version of this image)
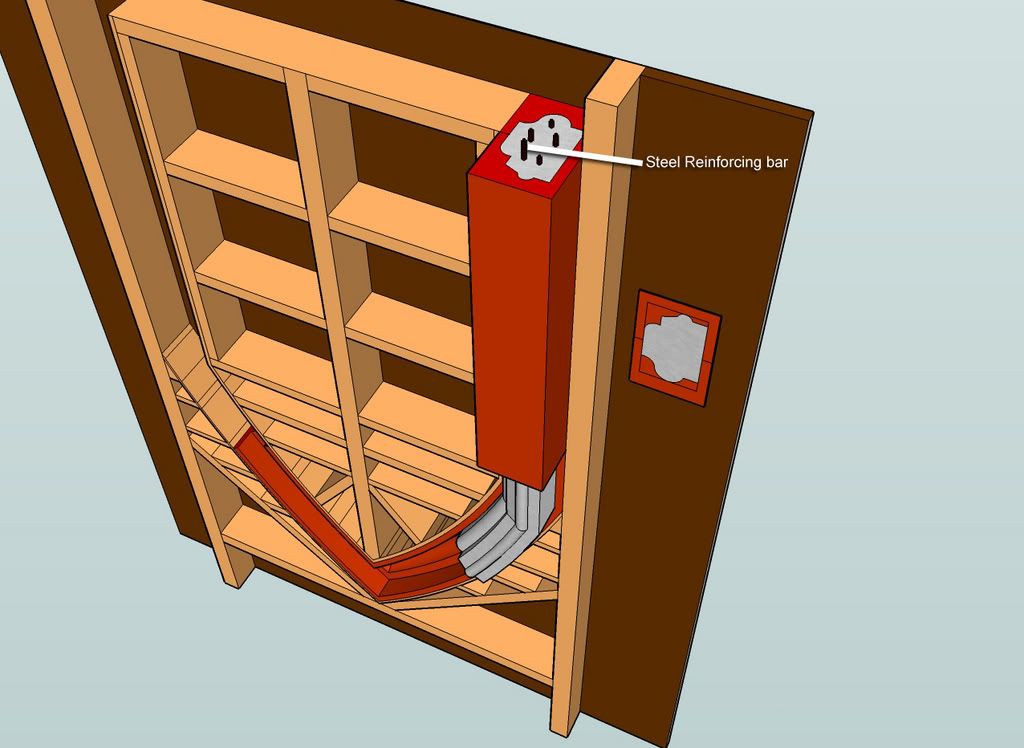
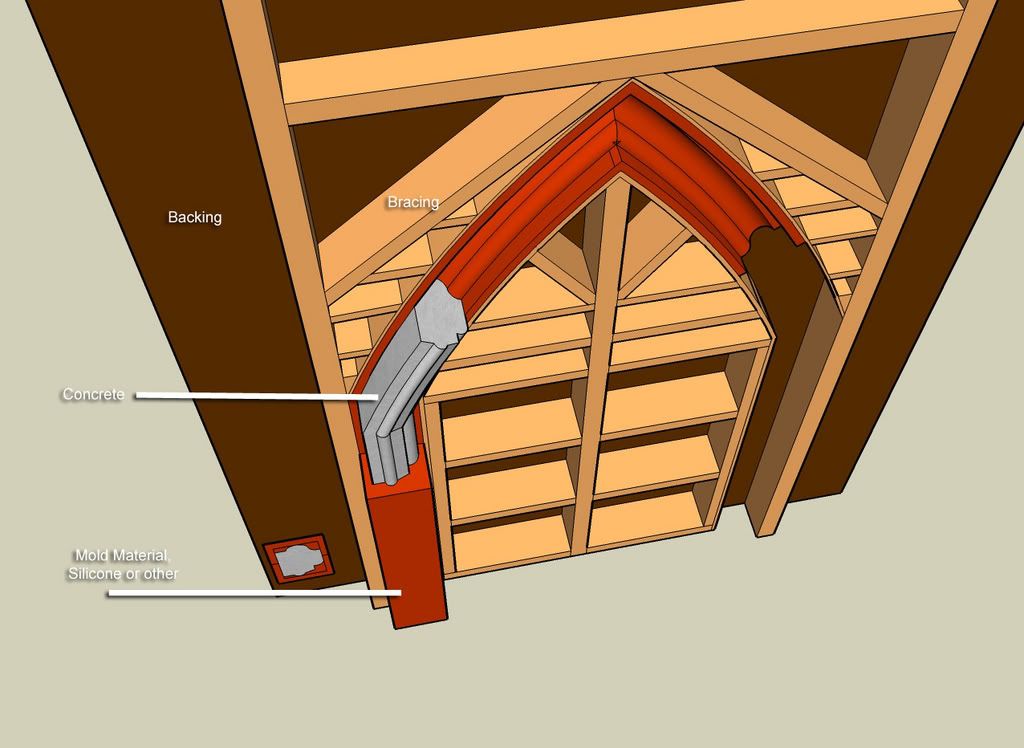
In this picture, the window is upside down, as this is how cement would be poured into the mold. There is only HALF of the mold depicted here. You would need the other half mirroring the one depicted to complete the assembly and pour.
The dark brown represents the backing of the mold, likely a strong sheet of plywood.
The light brown represents the bracing of the mold. The heavy parts could be 2x4, or other stock depending on the weight and amount of cement being poured. The last thing you'd want is for the form to flex or leak, so I figure to over-brace and over build is probably better.
The red material is whatever you can use to take the form of your object. Most places seem to sell a pourable silicone or similar rubbery material that solidifies around your object that can be easily cut and flexed to allow the object to be removed.
The grey material is cement. The cement would be poured from the open ends of the mold.
The black rods are steel reinforcing bar (re-bar). I'd personally use re-bar and probably wrap it with chicken wire to provide extra strength for the cement. This will help prevent cracking during movement and installation. You'll want extra reinforcing at the peak of the window, as sharp corners are going to be the areas most likely to crack. You'll need to support the re-bar in the mold in such a manner that it does not breach the outside of the cement (it can't touch the red part). This could probably be done with string, small gauge wire, or similar. You don't want it creating a thin area where it might breach the outside of your window or arch, or cause rust stains to develop.

When the halves are assembled for pouring, I'd use screws, bolts and nuts, C-Clamps, or whatever is most suitable to prevent the halves from separating.
If you were truly a glutton for punishment, you could take your window frame or arch and cut it into segments. If you look at many arches, they are composed of segments that were blocks of stone, each carved to match the next and continue the shape of the arch. Cutting your arch into segments and faintly beveling the edges where the segments meet would simulate this same look. Don't forget to compensate for the material removed by the saw blade that will shorten the overall length of your arch. Add even a little bit more realism by creating tooling marks in your object that look like real stone working tool marks, and even use cement dye to color the individual segments slightly differently, like it came from different blocks of stone.

This picture is from Building Construction Illustrated, Third Edition, by Francis D. K. Ching and Cassandra Adams. Ch. 5, pp. 20, Wall Systems: Masonry Arches. Provided to show some of the forces in the arch as well as various arch styles.

No idea where I found this one; again, more style information. I'll credit the artist if anyone knows who that might be.

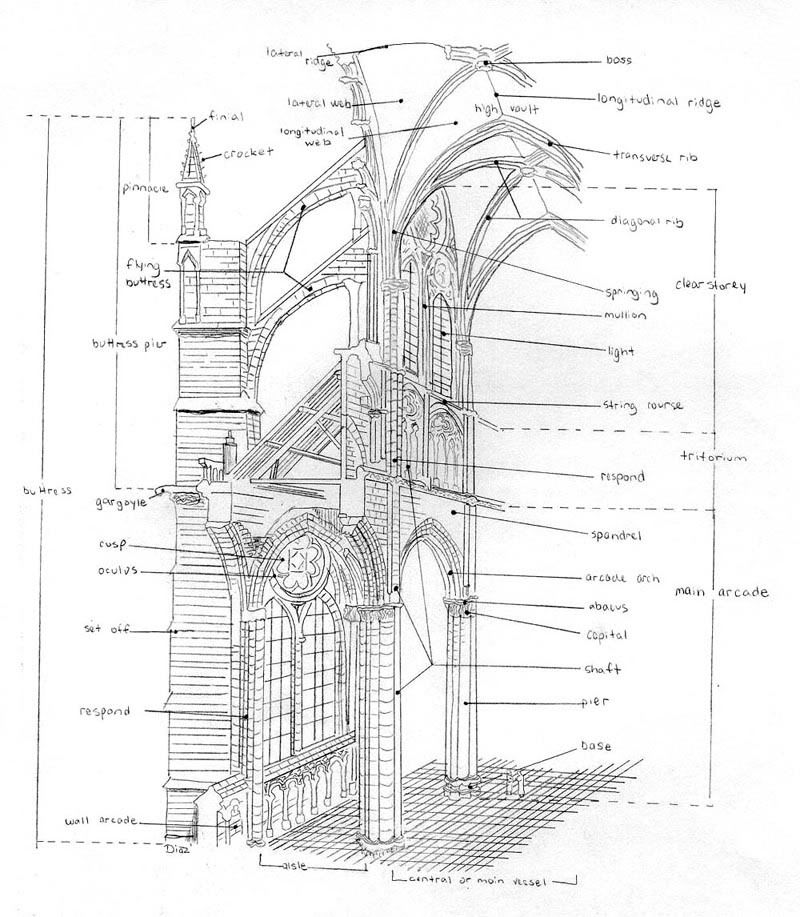
Another image naming the various parts of arches and vaults in a cathedral. Again, I saved this pic a long while ago, and if anyone knows the author I'd be happy to give credit.
* Please note, follow whatever instructions and safety requirements for the molding agent and material you are using; the ideas above are only generic and meant to provide inspiration and ideas to readers. These are only general ideas and thoughts on how to build an arch, follow them and implement them at your own risk.
EDIT: A little more research revealed that latex molding materials are considerably cheaper than silicone. It may not be as durable, but if you only need to make a few pieces, it's probably better to go that route and not have some expensive molds laying around that you'll never use again.

It was extremely interesting for me to read this article. Thanx for it. I like such topics and everything that is connected to this matter. I definitely want to read a bit more on that blog soon.
ReplyDeletemaybe the author is F.D.Ching he writes books for architects.
ReplyDeleteGreets from Macedonia:)
Thanks Aleksandar; you are correct, the top photo is from one of Ching's books as credited, the other two aren't.
ReplyDeleteGlad to see a visitor from across the pond, hope you enjoyed the site. Thanks for visiting!
Jeff