Monday, December 24, 2007
Wednesday, December 19, 2007
ExcelCalcs
ExcelCalcs hosts user generated Microsoft Excel formula for everything from quadratic equations to snow loads and rectangular spread foundation analysis. The site seems to be relatively new and if it keeps going it may turn into a real go-to place for calculations that one might need to build a home; until then it's still worth a look.
Troll Haven
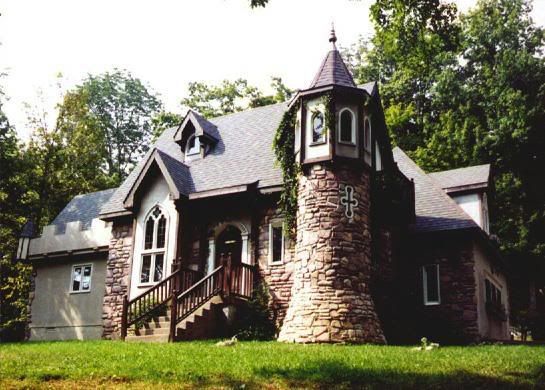
Troll Haven is located in Gardiner, Washington.
While not labeled a "Castle", this building certainly fits in among the other creations that share the label on this site. The owner-built creation was put together just for fun from what I can gather. Troll Haven is a private residence but tours can be arranged, and there are vacation homes and the expansive grounds can be rented for reunions, weddings and various other functions.
Not sure how to classify this one!
Solomon's Castle in Florida.
This castle is in it's own shining armor. Built by Howard Solomon since 1972, this castle has grown into a 12,000 sq. ft. tourist attraction used as a gallery, restaurant and shop for Solomon's art. The exterior is covered with discarded aluminum printing plates, giving a brilliant finish. Very little construction information available and no good pictures of the interior to be found. You can rent a 500 sq. foot efficiency apartment as a bed-and-breakfast room at the castle.
Hammer-beam roof
I had created one of these structures using Sketchup and mistakenly called it a truss or support. I learned recently that these structures in an open timber roof are called "hammer beam" type roofs. For any would be castle-builder a "great-hall" is probably on the wish list to be built as part of the structure, and having a hammer beam type roof over the room is probably part of the design. Thanks to modern construction techniques one could probably build a roof in such a manner that the components of a hammer beam type roof would not be structural. Try designing a hammer beam type roof and telling the building code department that it's going to hold your roof up. I think you might run into some trouble there unless you're a structural engineer, and even then I'm sure there'd be resistance.
Just my opinion, but I think the better route using modern materials to accomplish a hammer beam type roof in your modern castle would be to use a steel ridge beam supported on either end of the room by steel supports. This allows for a very strong structure holding the roof peak up with no worry about sagging. The hammer beam roof trusses could be constructed of lighter wood and/or hollow glued-up components (like a hollow square table leg) and affixed to the roof and walls. It would still likely require stronger roof rafters as the hammer beams would likely be partially suspended from them and thus incur additional expense in the roofing materials, but it would seem to be cheaper than having heavy, solid beams engineered to support the real thing.
The picture is from Buffalo Architecture, more info on hammer beam roofs there, as well as Wikipedia.
(EDIT:Updated links due to changed web address)
Castle for Sale
I found this castle for sale in Hiram, Georgia. It looks to be of the "modified residence" type, but I can't tell for sure. The pictures lead me to believe that it was a regular house that has been remodeled and added to. If I had to guess, I'd say the exterior is concrete block and stucco. At any rate, you can have this 3,200 sq. ft. castle plus maid's quarters for $1.3M USD.
Sunday, December 16, 2007
Shameless plug for my better half's store...
Want to get your loved one a nice piece of jewelry? Visit my wife's stores on eBay and Ruby Lane. A large selection of vintage and antique fine sterling and costume jewelry, specializing in sterling Norwegian Enamel pieces. We occasionally have items from English makers as well. Items that we have fairly regularly: David Andersen, Bernard Instone, Bernhard Meldah, Norman Grant, Murrle Bennett, Theodor Fahrner, Volmer Bahner, Ivar Holt, Wachenheimer, Arne Nordlie, Finn Jensen, Aksel Holmsen, Hroar Prydz, Charles Horner; and costume pieces by Miriam Haskell, Castlecliff, Danecraft, Juliana, Goldette, Lisner, Schiaparelli, Coro, Hobe, Mazer, Sarah Coventry, and many others on occasion. Anything from brooches, necklaces, rings, tie bars and cuff links.
Yep, it's "keyword spamming" and a shameless plug, but we gotta pay for the Christmas presents somehow!
EDIT: We are no longer selling on Ebay as of April '08 due to Ebay's changes in policy towards sellers. The changes raise fees, eliminate the seller's ability to leave feedback for buyers (all of our sales ID's have 100% positive feedback), and reward buyers that have bad behavior by giving them discounts when they complain. This raises the costs to small sellers, who essentially built Ebay when it was young, prevents the checks and balances system from working by allowing dishonest buyers to get away with their practices, and rewards buyers that place unjustified complaints to get a discount at the expense of the seller. This also means that there will be less variety on Ebay, making it harder for people to find oddball and unique items. Ebay, it appears, is no longer interested in small sellers and is driving towards large volume sellers who can handle the fees and feedback hits.
Please do visit the Ruby Lane store, we've moved everything to the new location!
Labels:
Bahner,
Castlecliff,
Coro,
Danecraft,
David Andersen,
Fahrner,
Haskell,
Holmsen,
Holt,
Horner,
Instone,
Jensen,
Juliana,
Lisner,
Mazer,
Meldah,
Murrle Bennett,
Nordlie,
Norman Grant,
Wachenheimer
Friday, December 14, 2007
Roofing material
After a recent comment by a visitor I decided to look at roofing materials a little closer. There are a lot of materials available to the builder out there, anything from the standard wood shingles to terracotta tile. What one chooses will be a matter of budget, environment and aesthetic choice.
Starting with the basics, the standard shake or shingle roof.
These can last 30-50 years, but usually are only "guaranteed" to last 25. These are usually made from cedar trees, can be expensive to install, and can require periodic maintenance to re-seal the wood. Also, local fire code can prohibit their use in some areas, and some insurance companies may not like them other due to the fact that it is wood, and will burn or ignite relatively easily. They look great, though, and aesthetically can make or break a building depending on the style you are going for. The shingles age to a nice silver or dark brown depending on how they are treated, and can really add a sense of age to a building. These cost anywhere from $70-170.00 per every hundred square feet of roofing and depends on the type (shake or shingle), size and roof pitch.
There are substitutes for this type of roof that look very similar that are made from asphalt or cement-type material. They look pretty close to the real thing, last longer, require less maintenance, and in case of the cement based shingle, can be almost fireproof.
While on the subject of cement based shingles: Something to consider- the cement based shingle weighs a lot more and will require extra support, that means more or heavier trusses, and that means it will cost more due to the extra structure. Double the cost of wood shingles for the first-time installation. That's pretty substantial, but the investment will be returned over the lifetime of the building. These shingles will outlast you, and remain in service for around 100 years. Quite a selling point to a potential buyer, fire resistance and a roof that will probably last 2-3 owners. This product also comes in a wide variety of styles, anything from shingle lookalikes to simulated slate.
Next choice, metal roofing. This roofing type features some of the same benefits and drawbacks of cement roofing. It also comes in a wide variety of styles; shingles, slate, flat, strips, copper, anodized, painted; the choices are only limited by budget. The cost: $100-600 dollars per 100 square feet, the top end being the cost of a beautiful copper roof. The benefit: almost completely fireproof, looks great, very low maintenance, and can last up to 150 years.
Slate roofs are one of the most expensive. $1000 per 100 square feet. The reasons? Extra support required to hold the weight of the stone roof and the need for a skilled craftsman to install the material. This would be a great material to have if you didn't have too many budget constraints, it's as old-world real as you can get. The slate itself will last forever, it is stone, but the roof may require maintenance to repair cracked shingles or the hardware used to affix the slate to the roof. Slate roofs look fantastic, though; especially with age. They add a sense of weight and solidity to a building, as well as old-world charm.
Along the lines of old-world charm, there is simulated thatch available, but this stuff is even more expensive than slate. $1300 per 100 square feet, not including any hardware or special parts like eaves or corners. The material is PVC, and fire resistant. It looks just like the real thing, is low maintenance, and lasts around 50 years. If you absolutely have to have that thatched roof on your castle or cottage, this would be the way to go.
Another roof type is a rubber roof. If your are installing a "flat" roof, one with a very low pitch, this can be a viable choice. Rubber roofs (E.P.D.M.) cost a little less than $100 per 100 square foot and can last 50 years.
Terracotta roofing will be around $500-800 per square 100 ft. to install. Like slate or cement, weight is a consideration when installing this roof type. Another consideration is that some types are porous, and can absorb water. Not a problem in a perpetually warm area, but if you live anywhere that there are below freezing temperatures regularly your roof can disintegrate, so this type will likely be restricted to warmer climes. This material can be very colorful, and looks great. It also will not burn, so fire resistance is a benefit.
Again, these costs are only general and don't include the costs of any structural modifications needed to support the roof, nor does it include the cost of any extra work or materials needed to work around chimneys or vents, or hardware such as flashing and gutters. Roof pitch can also contribute to cost. Also, local code obviously is a factor. One additional benefit is that some roof types may get you an insurance discount due to longevity and fire resistance.
For the structure I'd like to build, I would probably choose a simulated slate or a metal roof. One for the looks or the other for durability, either of them are good for fire resistance and low maintenance . If budget were no constraint, copper or thatch would be a consideration.
Wednesday, December 12, 2007
Castle Thornwood
Castle Thornwood is a castle in planning located near Anchorage, Alaska.
I came across this site while digging for castles using a search engine other than Google. I'm not entirely sure, but as far as I can tell, the land has been selected and purchased, but no construction has begun. There are some pictures and plans on the Castle Thornwood website. I'll take a guess that the castle owner/builder is near Wasilla, due to a recent spate of visits to this site from that area. Good luck with your castle!
Tuesday, December 11, 2007
More on how to build an arch
Ok, after adding to and reviewing my "how to", I realized it's a pretty poor description. It's difficult to describe all the parts and what something looks like, so I went ahead and threw something together in Sketchup to provide a better depiction of how I would build a Gothic arch, specifically in this case how I would build a window frame.
You'll need to build your window or object that you wish to make copies of at least once by hand. You could build it out of wood, strong foam, plaster, clay or whatever suits your abilities best. It has to be exactly what you want it to look like, fit and finish, because every flaw will come out in the end. You are making copies of every mistake.
You'll need both halves of the frame complete. Your object to be copied must have some kind of mold-release sprayed on it in order to remove it from your mold without the silicone adhering to it and causing damage to your mold due to tearing. Place some small blocks of already cured silicone in the bottom of one half of the frame, these should be of a height to center your object in the mold half so that it is bisected along the edge of the mold. Pour silicone into your perfectly level mold around your object to fill the mold up to the edge. (I suppose that I should have mentioned that the ends you left open to pour cement in the mold should be sealed for this) Allow the molding agent to cure. Do not remove your object. Once it has cured, add mold release material to the cured material so that the next silicone will not stick to it.
Combine the two mold halves and secure them together. Through the ends where the cement would be poured, or through a hole cut in the backing (It may be too difficult to stand your mold on end to pour the agent in from the end if your piece is too large, or if you feel your object will shift or fall out of the half it is in; so you may need to cut a hole in the backing that will allow you to fill the mold half while laid flat. This is a much safer method.) you will need to fill the remaining mold with the agent.
Allow to cure.
Remove the clamps or whatever you've secured the halves together with.
Separate the mold halves carefully. With any luck, the releasing agent will have prevented the silicone from sticking to itself or your object. If not, good luck. You should also be able to remove the object from the mold.
Cut holes in the mold somewhere that is not visible in the finished product (such as the bottoms in the window depicted) where you can pour cement, and you now have your mold. You can make as many copies of your object as you want, for as long as the silicone lasts.
(right click image and select "view image" in Firefox to see a large version of this image)
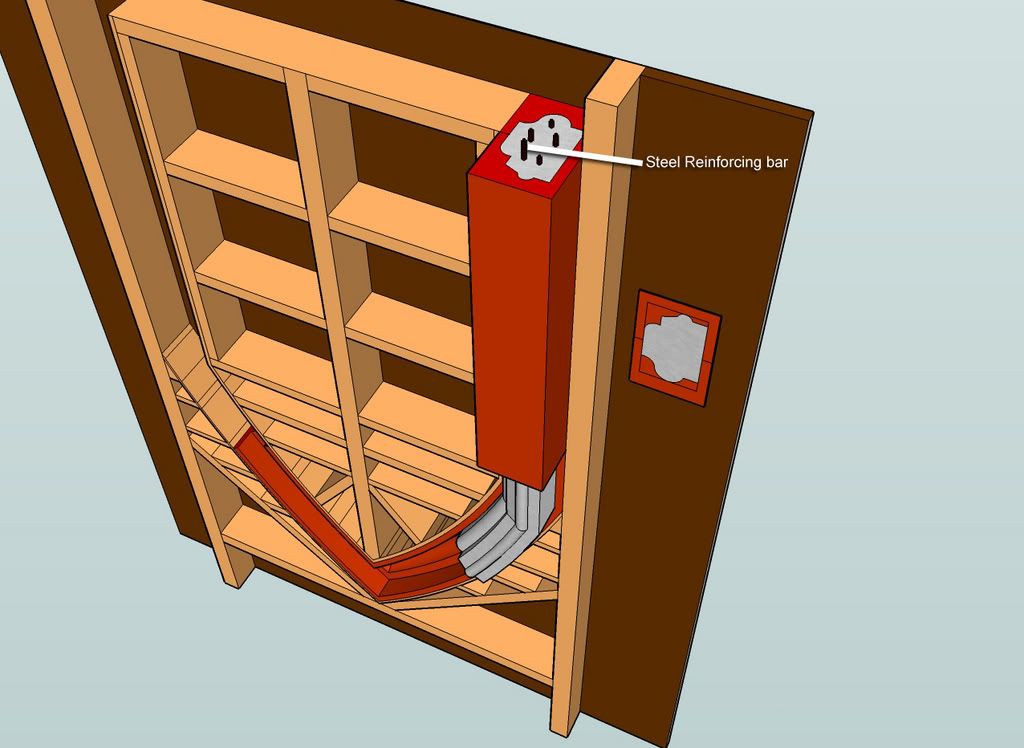
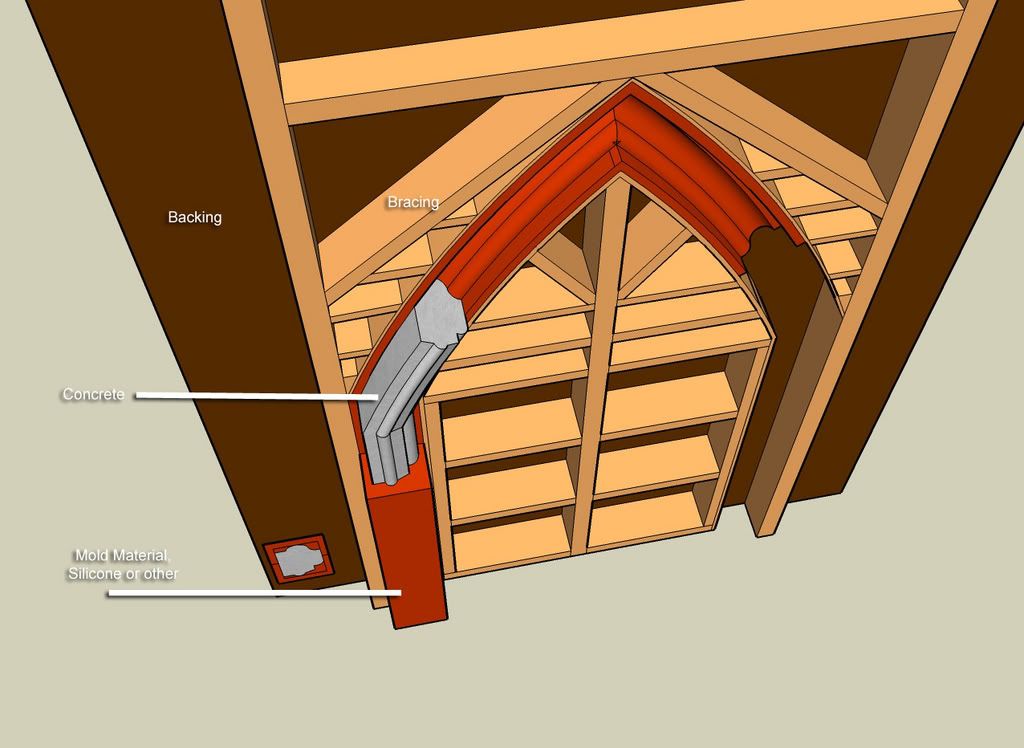
In this picture, the window is upside down, as this is how cement would be poured into the mold. There is only HALF of the mold depicted here. You would need the other half mirroring the one depicted to complete the assembly and pour.
The dark brown represents the backing of the mold, likely a strong sheet of plywood.
The light brown represents the bracing of the mold. The heavy parts could be 2x4, or other stock depending on the weight and amount of cement being poured. The last thing you'd want is for the form to flex or leak, so I figure to over-brace and over build is probably better.
The red material is whatever you can use to take the form of your object. Most places seem to sell a pourable silicone or similar rubbery material that solidifies around your object that can be easily cut and flexed to allow the object to be removed.
The grey material is cement. The cement would be poured from the open ends of the mold.
The black rods are steel reinforcing bar (re-bar). I'd personally use re-bar and probably wrap it with chicken wire to provide extra strength for the cement. This will help prevent cracking during movement and installation. You'll want extra reinforcing at the peak of the window, as sharp corners are going to be the areas most likely to crack. You'll need to support the re-bar in the mold in such a manner that it does not breach the outside of the cement (it can't touch the red part). This could probably be done with string, small gauge wire, or similar. You don't want it creating a thin area where it might breach the outside of your window or arch, or cause rust stains to develop.
When the halves are assembled for pouring, I'd use screws, bolts and nuts, C-Clamps, or whatever is most suitable to prevent the halves from separating.
If you were truly a glutton for punishment, you could take your window frame or arch and cut it into segments. If you look at many arches, they are composed of segments that were blocks of stone, each carved to match the next and continue the shape of the arch. Cutting your arch into segments and faintly beveling the edges where the segments meet would simulate this same look. Don't forget to compensate for the material removed by the saw blade that will shorten the overall length of your arch. Add even a little bit more realism by creating tooling marks in your object that look like real stone working tool marks, and even use cement dye to color the individual segments slightly differently, like it came from different blocks of stone.
This picture is from Building Construction Illustrated, Third Edition, by Francis D. K. Ching and Cassandra Adams. Ch. 5, pp. 20, Wall Systems: Masonry Arches. Provided to show some of the forces in the arch as well as various arch styles.
No idea where I found this one; again, more style information. I'll credit the artist if anyone knows who that might be.
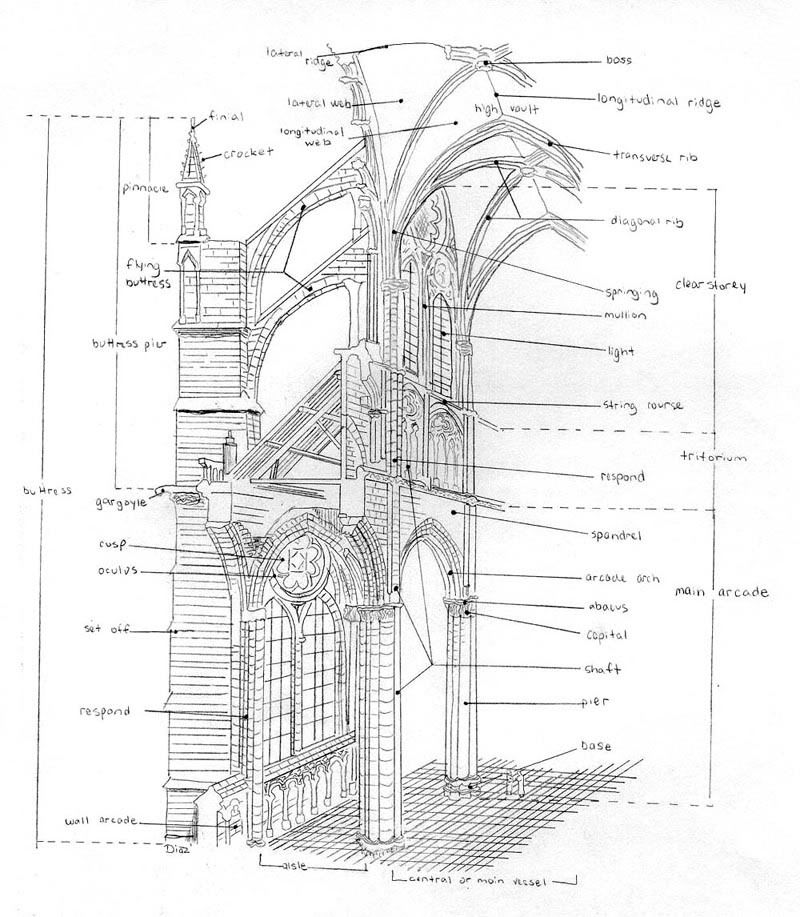
Another image naming the various parts of arches and vaults in a cathedral. Again, I saved this pic a long while ago, and if anyone knows the author I'd be happy to give credit.
* Please note, follow whatever instructions and safety requirements for the molding agent and material you are using; the ideas above are only generic and meant to provide inspiration and ideas to readers. These are only general ideas and thoughts on how to build an arch, follow them and implement them at your own risk.
EDIT: A little more research revealed that latex molding materials are considerably cheaper than silicone. It may not be as durable, but if you only need to make a few pieces, it's probably better to go that route and not have some expensive molds laying around that you'll never use again.
Labels:
arches with molds,
cast cement,
how to build an arch,
Sketchup
Sunday, December 9, 2007
Sketchup again
Another model created with Sketchup. I like how this one is taking shape. I tried to place more interesting architectural details in the exterior, and the resulting shape will certainly create a more complicated interior as well. That is what I'm after, though... This isn't some run-of-the-mill box that I'm wanting to spend my money, time, sweat and tears building. It's gotta be one of those things where, after I'm done swearing that I'll never ever build one again, I look up at what has been accomplished and think that it's pretty dang cool...
Saturday, December 8, 2007
Sprayed-foam insulation
I've mentioned in the past that ICF might be one of the methods we considered for building the shell of a structure; but costs to use that method are fairly high, as well as it not always being very easy for the inexperienced owner-builder to use. One of the benefits of the ICF method is the high R-value you get compared to most other materials. One of the ways to bring up the R-value on other construction is to use spray-in insulation, Icynene being one of the more widely known. But... Icynene costs around $4+ a square foot to have done; you can't really do it yourself too easily due to the tooling and experience necessary to do the job. At that cost, I've seen estimates for a 2,500 sq.ft. home costing well over $20,000 for walls and roof. That's a LOT of money for just insulation.
Well, maybe there's a way around that. Fomo Foam sells DIY spray-in insulation kits that could cut the cost significantly for an owner builder. Fomo Foam costs just over $1 per square foot of wall. Compare that to fiberglass batting which can cost $.50 per square foot per inch, and cellulose which costs a little over $1 per square foot as well. Looking at it that way, using the DIY spray in foam looks to be by far the best. You'll get as good as, if not better, insulative qualities than cellulose, none of the slightly hazardous problems of installing fiberglass, and have the sealing qualities of foam. Sounds like Fomo Foam might be doing some more research on.
Friday, December 7, 2007
Small Blue Printer
Now this is interesting: Small Blue Printer allows you to put together a basic floor plan on your web browser, no software download or experience necessary. It even offers a "3D" view. Now, it isn't a full-blown architect program like 3D Architect or a modeling program like Sketchup and so it's features are limited; but if you want to experiment with basic layouts for your dream home or castle, it'll do just fine.
Thursday, December 6, 2007
Update
I've updated the "How to Build an Arch" post here on the blog. It seems to be very popular (over 20% of the hits here). It now includes more information on building arches.
A few links at the bottom have been updated and added to; also, check out the "New American Castle" again, they've updated the site photos.
Wednesday, December 5, 2007
Castle Freedom
Castle Freedom appears to be a large castle in planning stages. Not too much specific information, just a general idea of what they'd like to have. The author links to a self improvement site, not sure if there is a commercial connection there.
Lacey Michele's Castle
Lacey Michele's Castle is located in west Arkansas.
This castle has a sad story behind it. To sum up a bit: The builder happened to find out that he'd had a daughter with a previous girlfriend, and the girlfriend hadn't mentioned it to him. After finding out, he struck up a good relationship with the child, and promised to build her a castle someday. Tragically, the little girl died due to complications of the flu and the medication she was on. The builder went ahead and built the castle in her memory. The full story here: USAToday.com
Constructed of stone and cement, along with whatever found/purchased items could be added such as metal roofing, found garden gates, and vinyl windows. Some of the site photos seem to indicate that it is still partially under construction. What an incredible amount of work, and the result is very impressive.
The castle has a section that you can rent for $110/night, and is located in a rural area suitable for all kinds of outdoor activities, from hunting to hiking.
Saturday, November 24, 2007
The Brattle Book Shop
We occasionally go to the Brattle Book Shop in Boston. The shop touts itself as an "Antiquarian" book store, but they have a somewhat limited selection of old books, and personally I think the most collectible books are snapped up quickly by insiders or folks who have an "in" with the shop's operators. All the same they do have a lot of inexpensive used books (less than $5) for a large amount of them, and occasionally you can find something in there that is worth picking up. My wife went with the purpose of looking for books that might help identifying the antique jewelry she sells. I had no particular goal in mind, but I wound up getting over $60 in books myself, almost all architectural/castle associated. I'd recommend these if you could find them at a local used book shop, none were more than $15.
Castles of Britain, by Christine and Bamber Gascoigne
Castles, by Charles W. C. Oman
American Castles, by Julian Cavalier
The Construction of Gothic Cathedrals, by John Fitchen
The first three are pretty much just interesting to look at and worth browsing for some ideas as to construction detail. The final book gives some very detailed information regarding how cathedral construction was done, and it looks like some of the information could be used today to build a structure; everything from the mathematics behind vault construction to how wood was cut for bracing the structure in a decorative pattern.
Antiques fit for royalty
We happened across R. Jorgensen's shop while out and about hunting for antiques for ourselves or to sell on my wife's Ebay and Ruby Lane stores.
The Jorgensen establishment is just one of those places when it comes to price: "If you have to ask..." That said, there were some of the most beautiful historic pieces of furniture that I've ever seen outside of a museum present. There was quite a variety, and some of the pieces were very, very rare; of the type only seen in high-end magazines or the kind that you see on Antiques Roadshow where someone brings it in only to find out it was made by an early American furniture maker, and its worth enough to pay off their house... Everyone knows what good furniture slooks and feels like, but these items were quality; you could tell at first glance. it took no expertise on our part to see this. These are the kind of items that really could belong in museums.
The shop is very unassuming and not pretentious at all. We were very surprised when the senior Mr. Jorgensen himself took us up a brief tour of the workshop and showed us some of the incoming pieces that they'd purchased and were restoring for sale in the store. He was very kind and informative; and treated us like we really were potential customers, even though it was pretty obvious that we weren't purchasing (nor could we afford) anything.
At any rate, if you suddenly find yourself with a lot of extra cash and a castle that you'd like to furnish with historical beauties, check 'em out.
Sunday, October 14, 2007
Update
Nothing new here, no new castles found; but take a look at Castle DuPont's site, he's added some new pictures and you can see in very good detail the process of building a castle from CMU's. Currently, there are great pictures that show the CMU walls and waterproofing measures necessary to prevent water leaking into a partially earth-bermed building.
Also, I've been watching real estate trends to see what land might cost. After watching it climb rapidly in the last several years and now seeing it plunge almost as rapidly, it makes building your own house look more and more affordable. 1/2 - 1 acre north of where I live could easily cost $150K+, now there are multi -acre plots that cost less. I even found an 80+ acre lot for less than $100k, but with a price like that, it seems immediately suspect. Probably it is mostly swamp, is landlocked (needing to fight for an easement to get access), has no utilities nearby (an would cost a lot to get the utilities to), has environmental restrictions, high taxes, or any number of things that make the price not so nice. Still, if you wanted to go totally green and off the grid, it may not be such a bad deal.
Wednesday, September 19, 2007
Yet another model.
The problem with designing a castle yourself, if you're a castle fan, is that there are so many different styles that are interesting or just plain neat. To stick to one style tends to mean that any of the other features you like probably will not be included. Well, the good thing about computer modeling is that you can mash them all together to see what it will look like.
This castle is a little bit of everything. Yes, there are some things that aren't quite right: Windows are too large, bad positioning, eyebrow windows too large, a few missing features, etc... But you can get a fair idea of what the finished product would look like. It appears to be big, but it would be less than 4000 sq ft were it actually built (not including garage). The exterior could be easily and rapidly done in CMU and all decorative features applied as facade (such as half-timber or stone). The raised ground is backfill to 4' high, the wall would be 12' above the surrounding grade to give a sense of height. There doesn't even need to be a wall really at all.
Anyway, the model is available to view with Google's SketchUp, along with the rest of my creations.
Saturday, September 15, 2007
Storybook Homes
The path towards thinking of building a castle has been winding with a few stops at different ideas along the way, and my better half and I have looked at several styles and types of buildings and thought they were the all the "Cat's Meow" at the time. We both think old houses (read 75+ years) are great, they have character that the modern suburban cookie cutter homes lack. After owning an old house though, one quickly realizes all of the work that must be done to keep it up or fix it. There's a couple of times I've thought it would be easier to tear the house down and rebuild it than to fix some issues it had. Needless to say, we probably won't want another one...
We also took and interest in earth-sheltered homes. They're incredibly efficient, blend in with the landscape, and there's lots of DIY info out there on how to build one on a very tight budget. The efficiency comes partly from using the Earth's roughly 57F constant to shelter the building from any temperature extremes in the environment, and the often thick walls of an earth-sheltered home act as thermal mass to shield the interior from the temperature swings as well. It may come to pass that one of these gets built as a home first and a bigger structure gets built while we live in the smaller building. An earth-sheltered home can look like anything you want, from super modern to "Hobbit"-like.
Along the lines of the older homes, we also like "Storybook" homes. There was a brief run in the popularity of this style of home that peaked around the 1920s. They were generally smaller buildings that incorporated any combination of castle, cottage or even Tudor architecture to give it a look like it belongs in a fairy tale. The original homes are very desirable to this day an can be found in many places around the country, though they tend to cluster in urban areas. Storybookers.com is a great site to get more information and to see some examples of these homes. There is also a modern business selling plans for their version of storybook homes, the site is storybookhomes.biz. We purchased both elevation/description books from the site for ideas. They tend to lean towards the Cotswold cottage style, and some of the plans look more palatial than cottage-like, but it's really neat stuff to look at. Honestly, to build one of storybookhomes.biz's homes would cost a fortune due to all of the architectural details unless you built it yourself. The only thing that I didn't care for was that the layout of the rooms in the plan was completely modern; in other words, when you got inside the home you'd feel like you were in any other modern home and that, to me, seems to detract from the whole cottage or storybook feel that you would be trying to create with a building like this; but that's just my opinion, and that design may be exactly what some folks want. At any rate, both sites are worth looking at for enjoyment or inspiration, and the storybookhomes.biz has some link resources leading to specialized hardware or tradesmen that could be interesting.
(The picture is from the storybookhomes.biz site)
Friday, September 14, 2007
T. E. Breitenbach's Castle
T. E. Breitenbach's Castle.
I've had this one in the "links" section for a while, but apparently forgot to write a little something about it. T. E. Breitenbach's castle is an owner built castle that doubles as an artist's studio, classroom for art classes, and gallery. Mr. Breitenbach built his castle out of concrete block and veneered it himself with large stones. Absolutely worth looking at his site, the art is fun to see (reminds me of Bosch or Dali, except much lighter in mood), and maybe you could sign up for a lesson or tour while you are there.
Labels:
CMU,
owner built castles,
stone veneer,
T. E. Breitenbach
Thursday, September 13, 2007
Busboom Castle (and the second interview for the site!)
Busboom Castle is an owner built castle near Mahomet, IL.
Mr. Bruce Busboom has taken the time out of his busy schedule to answer some questions for this blog about his castle. Without further ado, here's what he had to say:
Many, many thanks to Mr. Busboom for returning my emails and allowing me to share this information with other would-be castle builders.
Mr. Bruce Busboom has taken the time out of his busy schedule to answer some questions for this blog about his castle. Without further ado, here's what he had to say:
How did you become inspired to build a castle?
I'd been a carpenter all my adult life, remodeled older houses, etc. and always wanted to build a new 'dream' house. When I started perusing house plans, none of them fit the 'dream' category. So I started sketching and estimating and resketching until I made it affordable.
What prompted you to actually start building?
I started stockpiling materials in 1987, stuff that went on sale, etc. I built all my own windows, cast the stone crennelations, drawbridge, etc. Finally it was time to start digging the foundation in 1993 and the ball was rolling. It's a big ball that cannot stop once it's started.
How much planning did you do?
I spent about five years sketching and planning. You can't do too much planning...it will pay off later ten-fold. In my mind, I drove every screw and nail five times before I actually installed it, every detail haunted my sleep.
Were there any difficulties with local laws/building codes/inspectors that you had to deal with?
No, luckily. I was building out in the country, and the county didn't have a real comprensive zoning law (at that time. They do NOW!). All they required was a sketch of the floor plan, which I provided. You couldn't readily tell from the floor plan that it was going to be a castle.
Was there any difficulty in obtaining financing for an unusual building like a castle?
I saved up for 20 years, worked three jobs, so I was able to buy all the materials without a loan.
How large is your castle?
5100 sq. ft., but that is not a real good description of size, since the ceiling in the Great Hall is 22 feet high. It contains the same volume as three 2500 sq. ft. houses.
What is it constructed of?
The exterior is 8" thick concrete 'split-face' block with special waterproofing additives. They are tied to the interior stud walls with galvanized metal, but there is a 1 1/2" airspace between the block and the first layer of insulation - 2" extruded foam. The foam is glued and nailed to the outside of the studs, 3 1/2" fiberglass insulation in the stud cavities, then 1/2" O.S.B. screwed to the inside of the studs. Aluminum foil is glued over that, finally a layer of drywall on the inside.
How long did it take to build?
Nine years.
Approximately how much did it cost?
$120,000 - but that was in 1987-1993 dollars, and I bought everything on sale. It would cost at least three times that today, plus the cost of the land.
How much work did you do yourself?
Virtually all of it. I had friends stop in and help occassionally (51 of them), and my step-father was there for moral support. I hired a backhoe operator to dig the footings, cement finishers for the flat concrete, and when I got behind in the fall I hired three bricklayers to help with laying the block. I spent about $9,000 on labor. I did ductwork, wiring, plumbing, everything. I made my own trim, door jambs, etc.
Are there any special or unique features that you'd like to mention?
I think my castle has the only real, working drawbridge in the USA. I cannot find any evidence of another drawbridge except the Cinderella Castle at Disney World, but it hasn't been operated since 1980 for some reason. I would like to know if anyone has information to the contrary. The oak and brass elevator is pretty cool too.
Are there any special "green" or "environmentally friendly" features included in the construction of your castle?
Oh yes. If LEED ratings had been around then it would have qualified for a "gold" rating. Everything was obtained locally, recycled when possible, I cut down as few trees as possible and reused the lumber. As far as energy efficiency, my electric bill for the month of July was $20.97, keeping the indoor air temp at 74degF. Not bad for that large of a space. I am not kidding.
Any services you could provide would-be castle builders?
The most interest I've seen is in how the drawbridge operator was designed. Most of the castles I've seen just have a stationary drawbridge with chains hooked up to the side. They are still definitely cool though.
Any advice for would-be castle builders?
Make sure your wife is on board. And make her be involved in the planning and construction. I am now divorced, I can't afford to keep the castle and am finding out it is a 'white elephant' on the real estate market. Be sure it's what you want and that you want to keep it for a long time! And GOOD LUCK! Pursue your dreams...it is easier than you might think.
Anything else you'd like to add...
Busboom Castle is for rent, by the day, weekend, week or month! If you'd like to spend an evening or romanitic weekend and have the whole place to yourself, to get some ideas or make sure a castle is what you want, it is only $300 a night (including brunch).
Stop by the websites to support your fellow castle builder!
www.busboomcastle.com
Castle for rent, day, weekends, week or month
www.the-one-of-a-kind-store.com
Gags and Gifts, Uniques and Antiques, Art and Artifacts, Oddities and Novelties!
Many, many thanks to Mr. Busboom for returning my emails and allowing me to share this information with other would-be castle builders.
Wednesday, September 12, 2007
Fieldstone Castle (Old Man's Castle)
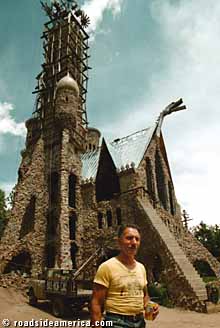
This castle is somewhere near Franklin, New Hampsire; it came up while digging through long defunct Geocities sites. These folks are truly building a DIY castle out of local materials one stone at a time. One of the pages is titled "How to build a fieldstone castle, cheap." The tower in the picture apparently only cost $2000. The site has a crazy layout and it's not the easiest to get around, but there's some interesting information there. I've sent an email in hopes that I can get more information about the castle and how it was built to share here. I'll post more if it happens.
EDIT: After returning and checking the site out more, I don't think the resulting room is anywhere near castle-like. I'll leave the post here all the same as the site shows how to build with stone and cement cheaply, which is still useful and interesting.
Labels:
fieldstone,
Old Man's Castle,
owner built castles,
rubble
Is this for real?
Realms of Legend.
The plan for this idea seems to be a small city and to have the largest castle and grounds in the United States. It certainly doesn't appear to be something that could be built by one or even a few people, and looks like it should require a large number of investors, lots and lots of money, and years to construct. Interesting idea, but the lack of updates to the site since the earlier parts of this year makes me wonder if the idea is no longer being pursued... I'll just have to categorize this one with the rest of the "wish castles" until something more substantial shows up on the site.
Contact from across the pond...
A visitor to the site from Europe stopped by and made a very good point, and something that I should've posted about a while back: The use of steel in construction. When building with ICF, CMUs or even slipform methods, we all think of the need for using steel reinforcement such as re-bar. There are a lot more uses for steel in modern construction though. There are steel framing components, steel floor joists, and even steel ridge beams. The steel ridge beam is pretty fresh in my memory; a friend of mine built his own house in New Hampshire. He needed a roof ridge beam (the part that holds up the crest or peak of the roof that can run the span of the building) that would take a load of around 55 pounds per square foot due to the snow load requirements needed to meet local code. Most ridge beams aren't terribly long, due to load bearing walls below they can be supported at various points along the span and not need to be engineered to a large size, or of a length that would have difficulty supporting the aforementioned weight. Basically, the longer the span, the thicker and stronger the beam must be to support any weight it must bear. His span went the full length of the building with no support except at the ends. He spent weeks on the phone trying to find a company that could supply an engineered wooden beam that would meet the specifications he needed, the closest any company came was over $3000 for a beam that could only support only 53 pounds per square foot. Finally, someone clued him in to the fact that he could use a steel ridge beam. Sure enough, he found a company that within one week was able to engineer and manufacture a steel ridge beam and supports, pre-drilled and delivered, for $1300. The reason this may be beneficial to castle builders may wish to support a long roof span without support beams interrupting the space below, and steel may be a way to make that happen. The visitor also suggested that the steel could be covered with a wood veneer to hide it if it is exposed to view, also an excellent point.
Thanks Mark, good luck with your castle!
(Examples I found on the web: the photo shows what appears to be a 4"x14" wooden ridge beam, the other photo is a steel ridge beam.)
Tuesday, September 11, 2007
Yeti Stone
Yeti Stone is located in Maine.
If you live in the Northeast and need someone who can build walls or buildings, quarry stone on or off site, or just about any other service associated with traditional stone working, have a look at Yeti Stone. The services described would be fit for a castle or a palace, take a look at the examples on the site. This individual will travel to your site and be a dedicated mason, and is willing to work with an owner to come up with affordable costs. Cost estimates to (hopefully) come when I get the "standard castle" designed.
Brick and stone working information
Happened across this site while looking for more castle information. It contains a lot of links having to do with stone working. Some of the links are redundant with information I've posted here, but the site is still easily worth a look. I noticed that the site is called SSRsi, the "Survival and Self Reliance Studies Institute". Why is it that many of the sites featuring do-it-yourself information pertaining to odd or older materials, or any serious level of getting off the grid/build your own green home always have New-age names and/or an anti-establishment feel that would drive away Mr. John Q. Public in a heartbeat? These sustainable architecture or "granola" -types (don't get me wrong, I agree with what they're trying to accomplish) love to say how great it is to live in earth-friendly dwellings and they can't understand why everyone doesn't live like they do, but presenting material with a "survivalist" pretense makes them their own worst enemy to their cause sometimes...
Thursday, September 6, 2007
Gothic Arches
Everyone has likely seen beautiful carved stone arches in the Gothic or Medieval style. If you wanted to build a castle, you probably wouldn't mind having some of these included in your design. I'm sure you're capable of carving these yourself out of stone.... What's that? You're not a stonemason? Ok, just hire guy to spend a few hundred hours carving individual arches.... What now? You can't afford that? OK, here's my idea, cheaper and DIY:
First of all, building an arch for a window yourself does not alleviate your responsibility of making sure that it is structurally sound and meets all code requirements, and if you actually try to build one using my ideas and you get hurt, it's not my fault! These are just ideas!
After watching too many DIY shows and now the Mythbusters (they make all kinds of cool stuff in their pursuit of destruction...er, science, I mean) it seems the best way to make a nice decorative arch for a window would be to form one out of cement by using a mold of RTV or some similar material.
Now, there's no getting around the fact that you are going to have to make an arch, at least one yourself, that is exactly what you want. I'll have to leave the construction method up to you, but several ideas come to mind. Pour plaster into a cylinder or approximate shape of the arch segment you are constructing and carve it to the appropriate shape (time consuming and difficult to maintain the accuracy of alignment when done in segments). You could block together an arch out of craft or large foam blocks and carve that to the desired shape (easier and cheaper). You could also build the whole thing out of wood (not too easy, not too cheap, but very durable). Either way, you'll have to build it at least once, taking into account the structure it will sit in, appropriate room for supporting and installing glass and affixing the whole thing to the structure of the building.
Once you've built the window frame, (I'll assume wood for the sake of not writing three different versions), you'll want to make sure that it is precisely the trueness, shape and quality you want for your finished product. You'll be using it as mold. Every imperfection or error will come out in the end product.
Build a wooden form capable of surrounding your arch laid flat, the form must have two halves. Make sure it is strong enough to support cement and will not "blow out" due to the weight of the material. You'll need to look for a mold-making how-to online at this point, I could fill a couple of pages on how to make a mold like this; if I find one, I'll post it. EDIT: Here's a video You can scale it up and use more appropriate mold making materials to make it larger. Once your mold is made and you extract your original part, you'll be able to pour as many cement molds of your arch as you want. You could even lay re-enforcing bar or wire mesh inside the mold to have strong, reinforced cement in the end possibly capable of bearing structural loads. One could make large windows and incorporate a hollow frame to hide or place a structural support inside. You could create door frames, gargoyles, decorative wall caps, decorative heraldry, all out of cement; durable, beautiful, and limited only by your imagination and what you are willing to try.
I have noticed that some of the mold-making materials are somewhat pricey, but when you consider what it would cost to make these things out or real stone, the price is considerably more reasonable. I suppose if you were good at it, you could sell some of your creations and make some money on the whole thing!
Another how-to here.
The "mouth" or "face" arch picture is part of T. E. Breitenbach's Castle.
How to build an arch
Arches and castles seem to go hand-in-hand many times, and I've wondered how to build them. Most masonry books tend to build straight walls, walls with square openings for windows, or other basic structures. DIYinfo.org has some fairly basic information on how to build an arch with brick or wood. This information could be used to create a stone arch quite easily, but the fit of the stone would have to be pretty good if you were going to make it out of dry stone; and if you were to use mortar in the construction of it you'd still want a good fit, otherwise it'll be more mortar than stone.
EDIT: Dec 6, '07
Another description.
This particular segment of the site seems to be by far one of the most popular (over 20% of the dreamsofcastles.blogspot hits), so for everyone looking for archbuilding information I've dug up some more information. Hope it helps!
To build an arched doorway in your house using wall board:
Kit Method
Totally DIY
How a barrel vault was built in a house
Building a Medieval archway:
Simple BBC Animation on how it was done
Arched ceilings being built at Castlemagic.com: (beautiful work!)
Tunnel
With framework still in place
Various arch forms being used to build windows and doors during construction.
If you can find it and are interested in the historical construction of arches and vaults, I'd highly recommend getting your hands on The Construction of Gothic Cathedrals, by John Fitchen ($13.00 USD at the time of writing this on Amazon.com). The book contains lots of information on how vaults and arches were constructed out of stone using Medieval methods. All of the information could be simplified and applied to building an arch out of modern materials. It only has about 6 chapters and the rest is notes and definitions, but it covers vault types, formworks, centering, explanations and drawings very thoroughly.
Want to learn how to work dry stone?
I happened across this site called the "Dry Stone Conservancy" while looking for a suitable example about a how-to on building a stone arch. The DSC is all about preserving, repairing and promoting dry stonework; and they provide workshops as well to those of us that might be interested in learning the craft and applying it towards building something of our own someday. Worth a look.
Half-Timber and Castles
Most of us associate castles with solid, thick, stone walls and minimal exterior decoration; but there are a wide variety of buildings that bear the description of "castle" (as some of the buildings on this or Castle DuPont's site will prove). One of the ways to add to your castle's height without having to raise stone multiple stories is to build the upper floors in half-timber style. Many European castles use this method in some of the buildings, though obviously half-timber construction is not as resistant to attack as pure stone would be. Aesthetically speaking, the half-timber look may be more pleasing to the eye, depending on your preferences. It may be even more affordable than stone would be to the prospective owner-builder. While I couldn't find any "how-to" articles on building in a true half-timber style, after a little thinking is seems entirely possible to build a solid first floor (whether it be stone, ICF or other material with a stone facade) and then the second floor could be standard stick framing or SIP. This would provide a lighter and easier to work with material to the home-builder, and the half-timber could be applied as a facade as one would apply stucco and window frames. The photo is of Kaiserburg. Wikipedia has some interesting information on timber framing, as well.
Leaded (or "Stained") Glass
Leaded and stained glass are not always the same thing; leaded glass is simply the process of joining together panes of glass with lead caming, stained glass is the actual painting of colored vitreous material onto glass and then firing it to melt the two together. Solid colored glass is sometimes called "art" or "slag" glass, but can also be called "stained" glass. Some folks would like to have leaded or stained glass in their home or future castle and it can be anything form affordable to outrageous. Seeing as this site is all about DIY, I think that everyone could do it themselves to create basic leaded glass to hang in a window or to cover a window completely. Check this site out: Leaded Glass Panel Tutorial.
As you can see there are a few necessary tools and the designs can be quite simple. Fired stained glass is an entirely different story, requiring: vitreous paints, a high temperature oven capable of precise temperature control, basic leaded glass skills and the artistry needed to create a painting as a work of art. Probably not suitable for the average DIY'er due to the high skill, time, and tool investment required. The point of this is that a lot of folks associate leaded glass and Gothic/Ecclesiastical architecture with castles and would love to have a window or three that filter the sunlight into their home. There are a lot of resources available on the internet as far as supplies an how-to books that will help you get what you need. There are probably classes held by local schools or individuals that could help as well. Leaded glass is definitely a beautiful addition to any home, and something you can make yourself to boot.
Updated Links
Verified active links, transferred links from postings to link sections at bottom of page.
"Build Your Own Stone House" (book)
"Build Your Own Stone House: Using the Easy Slipform Method" by Karl and Sue Schwenke.
Finally I've read a decent amount of this book, and I have to say that I have enjoyed reading it so far. The author has an easygoing style that allows the writing to flow in an almost conversational way. There are humorous little "asides" that bring in events that happened during construction, such as forgetting to leave a hole in the foundation for a drain or the neighbor's visit that caused a smashed finger. The information presented is a blend between completely ditching modern conveniences and construction methods but using them when necessary. Truly you could go into the woods with your tools and build basic house with just this book if you had to (as long as you had access to cement, anyway; after all, it is the "Slipform Method"!). The author concentrates his examples on the basic rectangular house that he and his wife built, but provides methods and suggestions as to what you'd need to do to build something different. For example: The author chose to build a roof with a low pitch, but provides charts to adjust the angle to something different. He also provides different methods of laying the stone, whether it be coursed or rubble.
Other recommendations he does make throughout the book are to make sure you know local code, do the necessary research an planning on your site (such as siting of a well and waste systems, building on proper soil types, alignment of the building to sunlight, etc...), use local agencies as required for things like water testing or soil testing, and if you're not sure of what you are doing, get the knowledge from someone who knows how to do it right. No need to have the building fall apart on you, especially when you're inside.
Sunday, September 2, 2007
Contact Me
Someone said that they found no way to contact me on the blog. I hadn't really thought about it, but now that it appears to be necessary I should provide some means. Place a comment to this posting to contact me. All comments are moderated, so I'll see it. I'm sorry I can't provide an email address, but the last thing I need is some bot trolling the blogs looking for email addresses finding mine so I wind up with even more spam in my mailbox...
Dry spell
Well, I haven't made too many posts lately. It would appear that I've found most all, if not all, of the owner built castles that are currently available on the web via popular search engines. Having kept an eye on the site almost daily, it seems that the all-time high of daily visitors was around 20 and has leveled off to around 6-8 per day. I really was never sure how much traffic a site like this would generate, so I guess I'm pleased that anyone is stopping by at all. There are a lot of search terms used that lead folks to this site, the most common are people looking for a few of the popular castles like DuPont castle, and the rest is a mish-mash of search terms that have to do with building castles from stone or other modern materials. This is kind of surprising in a way, because it means that there are several people that would like to know how to build a modern castle. That's great! I wish I had more concrete information to give the searchers, especially along the lines of "this is how I did it...".
I've also had a couple of inquiries from material vendors that have found the site and are interested in telling me about their wares. I always write back, but it appears that they haven't really looked at the site too closely; especially the parts of it that essentially say that I have no money... Funny, once they hear that they never write me back! So for vendors that happen across the site, don't run away! I'm happy to take information about your product as long as you can provide specifics as to how it may be applied to modern castle building, exactly how it would be done with your product and what benefit or support you, your product, or your company would provide an owner builder.
At some point, I'll put together a "standard castle" model with floors, square footage, exterior windows, walls, and doors. Differing materials can be applied to the structure so it can be used as standard cost gauge for walls, foundation, and floors is in a rough cost per square foot output.
As always, if anyone knows of a castle that is currently being built by the owners or owner-builders that are living in their own castle, I'd be happy to hear about it.
Wednesday, August 22, 2007
Books, books, books...
I recently picked up "Building Construction Illustrated, 3rd Edition" by Francis D. K. Ching, Cassandra Adams from Amazon.com. I'd seen it at a regular bookstore to the tune of the list price, but Amazon had it new for just over half price. The book contains a lot of information about buildings, not just residential. It covers everything in brief with lots of illustrations and descriptions; items such as: footings, wall types, foundations, roofs, steel, concrete, wood, stone, grading, etc... The book covers a LOT of material. If you want to get a better understanding of how buildings are put together, this is a great book to get your hands on. I picked it up to get a better idea of how a building goes together so as to be more informed when planning a build and speaking with sub-contractors. The one complaint I have about the book is that it doesn't cover ICF or SIP techniques! That's really bizarre, considering the book covers rammed earth and adobe construction, which are very uncommon techniques in the construction field.
I also picked up "The Owner-Builder Book: How You Can Save More than $100,000 in the Construction of your new Home." by Mark A. Smith, Elaine M. Smith. This book I have mixed feelings about. While it contains lots of worthwhile information, it also spends a large amount of page space with little side bars and quotes from previous readers telling you how great the book is and how much money they saved. I don't want to hear how great the book is, I've already bought it. Fill that space with practical how-to information and get rid of the fluff. The book also assumes fortunate turns of events (things that fall into your lap) such as cheap, discontinued products, access to multiple vendors for products to get the best deal, and just generally fortuitous events that happen to help you save money. This overabundance of "can-do" happy go lucky smacks of those "get rich quick" books. The book also makes contractors look like unscrupulous and greedy people. I'm not defending them (nor am I a contractor), but they aren't all bad. In a nutshell for this book: The real information is good, but the book could've contained more of it or been fewer in pages once the junk had been thrown out.
I've also picked up "Build Your Own Stone House: Using the Easy Slipform Method" by Karl and Sue Schwenke. Will post a little more info when I get into it.
Saturday, August 18, 2007
Old Cross Castle
Old Cross Castle is located in Missouri.
This castle turned up in a news article while using the search term "build a real castle" in Google. These "weekend warrior" castle builders originally started with a weekend house at the lake and have steadily grown it to the large castle seen in the article, one block at a time, every weekend they could. While modern owner built castles tend to be homes first and defensive last, according to the article this castle began because of security concerns. So far, it's the only castle I've found online that lists defense or security as one of the reasons for being built, even if in this case it's still just for fun. The castle itself appears to be a mish-mash of differing styles and materials. One could draw parallels between this castle and "real" castles; the original castles have been torn down, modified, or added to over time and feature a variety of styles and stonework added to them that were added over hundreds of years. The Old Cross Castle has simply compressed similar actions down to less than 2 decades. Looks like a fun place to hang out.
Castle Anam Cara Revisited: Interview
Castle Anam Cara revisited.
The owners of Castle Anam Cara have been very kind and provided me with this "interview" to share with the rest of the would be castle builders out there. Included is the philosopy and thinking that went into the why and how of this castle's genesis. One of the things that I've run across time and again while searching for owner built castles across the web is the cost involved in construction, many of the "castles" being built are constucted financially by owners who have no hand in the actual labor of creating their home. Castle Anam Cara is owner built on a shoestring budget, proof that even with little money and lots of dedication that one can have a castle of their own. Also, Castle Anam Cara is built with environmental efficiency in mind.
Edit: After trying time and again to "interviewize" the information provided me by Mr. O'Connor of Castle Anam Cara and present it in smaller slices to anyone who might be reading this, I just cannot cut it up and have it say the same thing. I've "cheated" and simply posted the information in its entirety and injected some of my own [thoughts or additional information] along the way. All links are added by myself. Some of the questions I asked when I initially sent an email to Mr. O'Connor were: Why did you build a castle? What was the philosophy or motivation behind building your castle? What difficulties did you encounter (such as with lenders) on the way to building the castle? How is the castle constructed? What concessions were made to modern conveniences in the construction of the castle? What environmental efficiencies were included in the construction of the castle? ...and other questions as well. Mr. O'Connor provided me with this information upon replying:
[Luckily, the builders of alternative housing tend to be very resourceful and buck the status quo just as Mr. O'Connor has, and can find ways to reach their goal of building alternative housing. As you can see in following information, it has required some sacrifices; but in the end, the castle was built!]
[I had no idea what "Swedish Technique" was, I had to do a little looking. One of the things that came up was information about Carl Larsson, a Swedish painter from the late 18- to early 1900s who influenced design, along with others of like mind, to eschew anything that made a room dark, heavy or gloomy and chose instead materials that made a home lighter, brighter and more airy. Oddly enough, he was a proponent of the Arts and Crafts movement which we Americans associate with Stickley-like Craftsman furnishings, which ironically are dark and heavy; but the style covers a much broader area that ranges from incorporating anything from dark, solid furnishings to Art Nouveau stylings and minimalist clean, bright, linear styles. One very fitting pillar of the Arts and Crafts movement one could apply to building a castle is the goal of simplicity and strength of design, and emphasis on good craftsmanship. The arts and crafts movement covers a broad range of styles, here and here are a few good places to get information about it.]
I would like to thank Mr. O'Connor for taking the time out of his very busy summer schedule to provide this blog with information about how and why he built his castle.
The owners of Castle Anam Cara have been very kind and provided me with this "interview" to share with the rest of the would be castle builders out there. Included is the philosopy and thinking that went into the why and how of this castle's genesis. One of the things that I've run across time and again while searching for owner built castles across the web is the cost involved in construction, many of the "castles" being built are constucted financially by owners who have no hand in the actual labor of creating their home. Castle Anam Cara is owner built on a shoestring budget, proof that even with little money and lots of dedication that one can have a castle of their own. Also, Castle Anam Cara is built with environmental efficiency in mind.
Edit: After trying time and again to "interviewize" the information provided me by Mr. O'Connor of Castle Anam Cara and present it in smaller slices to anyone who might be reading this, I just cannot cut it up and have it say the same thing. I've "cheated" and simply posted the information in its entirety and injected some of my own [thoughts or additional information] along the way. All links are added by myself. Some of the questions I asked when I initially sent an email to Mr. O'Connor were: Why did you build a castle? What was the philosophy or motivation behind building your castle? What difficulties did you encounter (such as with lenders) on the way to building the castle? How is the castle constructed? What concessions were made to modern conveniences in the construction of the castle? What environmental efficiencies were included in the construction of the castle? ...and other questions as well. Mr. O'Connor provided me with this information upon replying:
Perhaps the question most frequently asked of those who choose to build and live in a Castle is - “Why did you build a Castle?” Would that the response were as simple as - “It is so romantic and I’ve wanted to build one all my life!” But alas, the roots and reasons are much more complex.
The process began with a set of philosophical parameters that would form the framework around which the project would develop. These parameters included:
1) Both I and my companion chose early in life to follow life paths which were markedly non-mainstream. Our political, socioeconomic, humanitarian, cultural and global views are generated from within based on substantial life experience and are not mere reflections of the views “the system” cultivates for citizen consumption.
2) Both of us follow paths that frequently lead us inward through meditation, creativity and mind/body activities.
3) Both of us define our “success” through evaluators such as positive impact on others’ lives, giving more than we take, happiness, helping others define their life paths and reaching a point where we know that we need nothing more than our minds and hearts to survive and thrive anywhere.
4) The accumulation of material mass such as modern furniture, televisions, new cars, boats, techno-gadgets, appliances, picket fences etc. etc.. holds no draw over either one of us.
5) Both of us feel very much connected to all people on the planet and consider ourselves citizens of the planet rather than nationalistic units.
6) Both of us stand up for what we believe in.
7) Both of us strongly believe in self responsibility
8) Both of us believe that the attempt to homogenize society is destructive both to the individual and society.
With these existing philosophies, it was apparent immediately that we would not (COULD NOT) build the all American dream home - cape, ranch, saltbox, Colonial - at the end of a cul de sac in a regulated development where we had to ask what color paint we could use. To do so would effect a surrender of principle, a surrender of our vision, a surrender of belief.
BUT, this also created some problems. For this shared philosophy also surrendered any ability to operate in the world of “conventional” financing. But we would deal with that as the project developed.
With this philosophical foundation I started the design process. Our home would be a structure that reflected our shared philosophies. Our home must be a physical manifestation of our individuality, our conviction to cause and our resistance to forced or “suggested” mental and physical conformity. It must also bring joy and knowledge to others, be a gathering place for the sharing of friendship and ideas, cultivate creativity, reject disposable consumerism and strengthen our commitment to our chosen life paths. As medieval Castles had roots in taking a physical stand against the onslaught of aggressors, our Castle would also represent the stand we have taken against the onslaught of control, compliance and conformity.
One need not look any farther than the [lenders] banks to witness the long arm of conformity. Alternative home designs are looked at with the same warmth as was the black plague. So we decided to design the home WE wanted and build it out of pocket. In keeping with our philosophy, we would also do ALL the work ourselves. If a home is to truly be OUR home, it must come from OUR minds, OUR hearts and OUR hands.
[Luckily, the builders of alternative housing tend to be very resourceful and buck the status quo just as Mr. O'Connor has, and can find ways to reach their goal of building alternative housing. As you can see in following information, it has required some sacrifices; but in the end, the castle was built!]
After months of living on the land in a 20 foot trailer through the coldest snowiest winter on record, I developed a primary design that fulfilled the philosophical requirements above.
I could write endlessly on the process of product and materials choice but will try to focus it down a bit. We wanted the house to be as energy efficient as possible, as self sustaining as possible, as “eco-friendly” as possible and as true to our goal as possible. American building options tend towards gadgets, computer feedback, composites, and standard sizes and shapes. I soon ended up researching Swedish techniques and talking with many of their research scientists on the concept and science of home building. Subsequently, I opted for effective, non-technological, passive, nature sensitive, low maintenance building techniques.
[I had no idea what "Swedish Technique" was, I had to do a little looking. One of the things that came up was information about Carl Larsson, a Swedish painter from the late 18- to early 1900s who influenced design, along with others of like mind, to eschew anything that made a room dark, heavy or gloomy and chose instead materials that made a home lighter, brighter and more airy. Oddly enough, he was a proponent of the Arts and Crafts movement which we Americans associate with Stickley-like Craftsman furnishings, which ironically are dark and heavy; but the style covers a much broader area that ranges from incorporating anything from dark, solid furnishings to Art Nouveau stylings and minimalist clean, bright, linear styles. One very fitting pillar of the Arts and Crafts movement one could apply to building a castle is the goal of simplicity and strength of design, and emphasis on good craftsmanship. The arts and crafts movement covers a broad range of styles, here and here are a few good places to get information about it.]
The decision as to what to build with was a major one. Stone was the obvious first reaction by most people. But, I do a lot of masonry and several red flags began waving. First, the time factor. There is no doubt that the best looking material for a Castle would be stone. But doing the exterior walls in structural stone would require literally years of work. We were living in a tent/trailer and could not envision the added years to get the structure even livable. Second, the use of stone requires a GREAT deal of additional structural preparation and materials which translates to much higher cost. Keep in mind that we are now building out of pocket on a limited budget. If money were not a serious problem we would NOT be living in a tent! After much research I settled on a concrete product. Concrete would fulfill the appearance requirements (even the old stone Castles were most often skim coated with a stucco like material), would be cost effective for us, and allow a reasonable time projection. The particular product was Sparfil 2...[I looked around for Sparfil for see if I could present an example or get more information about it. There is little information about it and no website for the company itself. Mr. O'Connor's description covers it pretty well, but from the information I could find, sparfil sounds like a similar material to Rastra Block, which is cement with recycled polystyrene in the mix]
This is a 12” thick by 8” high by 16” long block product. The body of the block is a mixture of concrete and insulating beads with 5 foam blocks filling 5 offset webs. Head ends are connected by insulating blocks. This gives a true, unbroken r25 wall. The blocks are dry stacked and troweled with surface bond cement. [Rob Roy mentions the use of dry stacking blocks and using a surface bonding cement in his book] . You can get some more structural info off of the Castle web site. The second floor ceiling has a Swedish vapor barrier and perimeter air gaskets. Above that is 16” of Canadian cellulose blown in insulation giving an effective r factor around r 80. The building is so well sealed that I have low volume (1/3 air change per hour) mechanical ventilation and make up air through a passive Swedish diaphragm tube.[This method of saving electricity is something some may be unwilling to pursue, or some methods may not be an option depending of the location of the site one would hope to build on; but they have done a marvelous job of proving that a castle need not cost a fortune to own and live in, and doesn't have to be a burden on the land around it or your pocketbook. It all depends on personal preference and what one is willing to do to reach their goal. Visiting the Castle's website, there also appear to be solar hot water heaters on the roof, an additional benefit to efficiency and savings.]
Your question as to concessions to “modern” techniques and amenities is indeed a good one. A GREAT deal of time went into this topic. Balancing off our desire to be totally self dependent and not “reliant” on the “system” for anything were some important considerations. We would be using the Castle for education - I am a gold and silversmith - I am a potter - I am a blacksmith - we would be doing shows, weddings, tours and banquets here - we want to live here forever (or however close to that as we can get!) - outhouses are not really good for the sensitive land we are on - there are going to be days when we don’t feel good - total “unplugging” from society was not necessarily our goal. So, we put in a drilled well. This gives us running water and flushing toilets in the house but we also put a hand pump on the well. We use this as much as possible to save energy and it makes us self reliant in the winter when snow and ice storms interrupt electric service. We heat with wood (we own 8 acres of wooded land) but put in an ultra efficient propane furnace as a back-up. If we are doing a wedding or tour and get home late, the two hour wait for the wood stove to heat the house up is not a practical option. The furnace has a sealed combustion chamber which uses outside air so it neither burns internal oxygen nor changes interior positive/negative pressure balances. The wood stove also has an outside air kit. We do have electricity which I need in my metal shops. But, all lights, switches and outlets are hidden in period decorations. Our hot water is electric which we only turn on every second or third day for about 30 minutes. Our monthly electric bill is only about $35.00 per month. We light primarily with beeswax candles in medieval reflector lamps.
The outside appearance is Medieval Castle. In fact, it is becoming even more so as I now add stone accents, more battlements, iron work, a corner tower, palisades, monoliths, fire baskets, banners and stained glass. Inside is completely done in Medieval fashion. Tables, doors, cabinets, window trims, toilet area, bathing area and beams are all made with salvaged 300 year old lumber. The upper floor is one room with a large banquet table (300 year old wood and seats 25 plus) and our canopied bed. This is true to early Medieval custom. Guests sleep on the floor as knights and travelers did. We heat with wood which means the lower level is nice and warm. On cold nights we can feel the coolness in the air upstairs. The bed has great drapes which we close against the cold at night. We step into the cool air in the morning and feel the physical connection with the winter air outside. We usually wear period clothing around the Castle. Even the toilet is enclosed with antique lumber to look like the lieu in a medieval keep.
The Castle has a lot of our intellect, blood, sweat and tears within its walls. It tested my mental , physical and emotional limits. 4 out of every 5 couples who undertake building a “modern” home together break up. [Visiting the owner-builder book website I came across a thread discussing the effects of building your own home on some relationships. For that particular site it wasn't 80%, but owner-builders indicated that it certainly ended some relationships.] It has brought my companion and me even closer than we were. The name of the Castle is Castle Anam Cara which means soul mate. It was the only name which seemed appropriate. The Castle is an island in a sea of oatmeal. It is a time machine transporting one to a time when people were far more connected to each other and to the flow of nature. It is a gate which opens inward. It is the manifestation of the Irish warrior call - Bona na Croin. Neither collar nor crown - We serve no master and bow to no man. It is our beautiful home.
I would like to thank Mr. O'Connor for taking the time out of his very busy summer schedule to provide this blog with information about how and why he built his castle.
Wednesday, August 15, 2007
Castle Douglas
Castle Douglas located in North Texas.
This castle is a "working castle" as said by the owners. Located in North Texas, it is a venue for weddings and other events. Photos of the interior show large open spaces for events, but I have no idea about the measurements for the building or what exactly it is constructed of. Perusing the press section of the site for information reveals mostly a bit of a story of the place and that it's the largest home by square footage in the county. The price for the construction of the castle was danced around, I don't think this castle fits in the budget for the majority of would-be builders; apparently the cost would only be generalized by the owners as "...less than 10 million." Wow.
New American Castle
The New American Castle appears to be more about fancy or expensive furnishings, food, appliances, and atmosphere than really much anything else to do with a castle. It reminds me of some of the homes built during the late 1800s to early 1900s that have a large turret in front with a stone facade. The castle is somewhat of a showroom, the owners aren't building any of it themselves as far as I can tell (hammer in hand, I mean...), but have solicited donations and manufacturers to donate everything from materials to high-end goods to be shown off at the business/residence. I can't argue with that, I'd do the same if provided with the opportunity; though I think I'd probably try to make a "castle" look more like a castle...
It also appears that some of the search links to the site are not functional anymore... The "museum" link works, but the link that appears to lead to what would be the site about the castle itself no longer works.
Castle Tirion
Castle Tirion is a castle in an unknown stage of development. I've come across this article as well as a discussion group and a few other tidbits of information about it, but nothing current. It looks to be a project being put together by a member of the SCA, but I don't know to what extent it involves the rest of the organization; probably just a resource for volunteers. I'd qualify this as a "wish castle", but the viewable extent of planning done seems to qualify it out of that moniker.
EDIT: I've discovered the origin of the name by chance. Reading J. R. R. Tolkien's "The Silmarillion" reveals that Tirion is the castle in the West, sort of a utopian paradise for the characters in Tolkien's Middle-Earth stories.
Castle Rogue's Manor
Touted as "America's newest castle", Castle Rogue's Manor is the creation of Smith Treuer. After finding this site and looking at the pictures, this castle reminds me more of a Victorian mansion than a castle. Still, it's a very impressive building. The amount of woodwork in the place looks like it cost a fortune, absolutely incredible. The interior has some of the feel of the great western lodges or hotels, similar to Yellowstone's old hotel; stone and wood. There's a news article here that has a little more information on the builder and how the castle came to be.
Sunday, August 12, 2007
Castle for sale
Crankinmoor castle is a castle for sale on eBay. I was looking for the castle featured in this article, but it didn't turn up, it has probably sold already or the owner gave up.
Edit: No longer for sale on Ebay, but you can see it here.
Bishop's Castle
Bishop's Castle in Colorado.
This is a very unique take on a castle. Jim Bishop has been working on this architectural oddity for over 30 years, and it's a real eye-catcher. I don't know if this really fits the definition of a castle, but once granted a little leeway for imagination, the name fits. The castle is still being built, tours are offered, and donations keep the work moving. Mr. Bishop apparently has some, shall we say "strong", opinions about the government, but you can't say the man isn't an artist.
For those of us with tight budgets...
You can build your own castle here at this website:
http://www.referencetable.net/dance/castle/
It may not last for the ages, but it'll pass a few minutes in front of the computer screen!
http://www.referencetable.net/dance/castle/
It may not last for the ages, but it'll pass a few minutes in front of the computer screen!
Friday, August 10, 2007
Castle for sale: Drachenburg
Drachenburg Castle
Happened across this while looking for castles that were for sale. Among the ones overseas, there are a few in the states that are available. At first glance I didn't notice that it was a converted home, but after viewing the photos the corner in the picture looks to be done very well, but the farther side needs to be brought up to match the rest. I can't tell if it's incomplete or the way the owner wants it. The interior looks really nice, they've done some good work on the windows, the vaulted ceilings with Gothic-style arches and the rest of the interior. You can have the castle and 43 acres 45 minutes from Nashville for $200K.
Wednesday, August 8, 2007
Yet another model
This one was loosely based on a few pictures of some Eastern European castles I've seen and/or visited. As with the previous design, there's a gatehouse and the main building. This structure is considerably larger: 10,000+ sq.' of space in the main building. This one doesn't have all of the outlying extra buildings like the previous model, so all of the functions would have to be accommodated inside. Towards the rear of the building would be a formal garden, the front would be event space. Below in the cellar area would be a pub/wine cellar as well as a "dungeon" divvied up into theme rooms for B&B guests. One of the drawbacks with Sketchup is that borders of other objects inside an object can be seen through the object if the border comes too close to the plane, so in this model you can see the edges of staircases, the level of floors, etc... poking through walls. Oh well, can't complain abut a free program. Wonder if this happens in the Pro version? Also, the basement is below grade, but Sketchup placed shadows where the ground plane would be. This hides the stairs and other below grade areas beneath opaque shadows. Solution: Raise model entirely above grade and place your own ground plane in the scene. Kind of a pain and adds another piece of geometry to the scene. Just how it goes.
Subscribe to:
Posts (Atom)